Thursday, June 28, 2007

Mushrooms with Coriander and Cumin


This mushroom curry is a slightly modified version of the recipe I usually make. The mushrooms are cut into larger chunks, and the serving size is smaller. It's an ideal side dish for two people.
Mushrooms with Coriander and Cumin

1/2 pound of mushrooms
2 - 3 tablespooons of sesame or olive oil
1/2 teaspoon of cumin seeds
2 cloves of garlic, finely minced
1 inch piece of ginger, grated
a few tablespoons of finely chopped scallions (I used the green parts)
a few hot chili peppers, finely chopped
1 teaspoon of coriander
1 teaspoon of cumin
1/2 teaspoon of turmeric
1/4 - 1/2 teaspoon of cayenne
1 small tomato, grated or mashed to a pulp
1/2 teaspoon of sea salt
freshly ground black pepper
3 tablespoons freshly chopped parsley


Wipe the mushrooms with a damp cloth and cut them into large slices. Heat the oil in a wok or frying pan over medium-high heat. When hot, add the cumin seeds and stir and fry for about a minute. Then add the mushrooms and stir and fry until the mushrooms are coated with the oil. Next add the garlic, ginger, hot chillies, scallions and ground spices. Stir and fry for a couple of minutes. Add the tomato, stir, and season with salt and pepper. Reduce the heat to low and cook gently for another 5 minutes or so. Add the parsley, stir and serve hot.

Wednesday, June 27, 2007

Asparagus and Oriental Tamari Dressing with Pine Nuts

This oriental-style asparagus and pine nut dish is a perfect accompaniment to small light summer meals, and takes little time to prepare and cook. Fried pine nuts give it nutritious protein-packed crunch, while the asparagus is… well, it's asparagus, nothing more needs to be said.

If you don't have some already, I urge you to buy a traditionally brewed tamari sauce made from slow-fermented soy beans instead of anything marketed as just soy sauce, which are usually made with 40-60% wheat as well as quick hydrolyzed soy protein and caramel colouring. Good tamari sauces are wheat-free, contain more digestible proteins, and taste so much better than ordinary soy sauces that you'll never go back. Fortunately, they're also widely available these days from reputable suppliers like San-J or Eden Foods.
Asparagus and oriental tamari dressing with pine nuts

1 bunch fresh asparagus
4 tablespoons sesame oil
4 tablespoons pine nuts
2 green onions, both green and white parts, thinly sliced
3 green chilies, seeded and minced
1 tablespoon tamari sauce
juice of one lemon
1/2 teaspoon sea salt
1/2 teaspoon sugar
dash of cayenne, or to taste
2 tablespoons white sesame seeds


Wash the asparagus and snap off the woody ends, then cut into halves or thirds and soak in water to keep crisp.

Heat 2 tablespoons of the sesame oil in a large frying pan or wok over medium heat. When very hot, toss in the pine nuts and stir a few times until the nuts are golden brown. Remove with a slotted spoon to paper towel and set aside.

Add the white parts of the green onion and the chilies to the oil and stir once. Quickly drain the asparagus and stir into the pan right away. Add 3 tablespoons of water, cover, and cook for 2 minutes.

Uncover and add the tamari sauce, lemon juice, salt, sugar, cayenne and the remaining 2 tablespoons of sesame oil. Stir to mix and cook for another 5 minutes or so, boiling away most of the liquid as you stir.

Remove from heat and add the pine nuts and toasted sesame seeds. Toss and serve.

Tuesday, June 26, 2007

The Daring Bakers present: Bagels

When I read that this month’s challenge was to make bagels, I was very excited – I’d never tasted the famous bread and what a nice chance to do so!I loved the dough: delicious to be kneaded and rises like no other. I also had loads of fun with the whole “making of”… I just felt sad about the look of the bagels – they’re so ugly, the poor things. Wrinkled like a Shar-Pei. :(Anyway, I thought the

Monday, June 25, 2007

Egg And Cornmeal Pudding With Refried Beans

Anyone who reads this blog already knows that I use cornmeal in all kinds of dishes, not only for its sweet corn flavour and crunchy-chewy texture, but for its incredible versatility — and this smooth and creamy pudding takes full advantage of the versatility of both cornmeal and eggs to take care of almost any kind of bean or vegetable leftover that you might have on hand. Here I use my leftover Refried Beans to give it a zesty Mexican flair, but even if you don't have any leftovers on hand, this pudding works just as well with a good few handfuls of some sautéed peppers, mushrooms, potatoes, corn, or whatever you've got on hand. For a more savoury version, add some of your favourite herbs or try using fresh grated parmesan cheese or crumbled goat's cheese for the topping.

It was a very successful use of leftover refried beans, and a good reason to submit the recipe to Chronicles in Culinary Curiosity who will be hosting the next Leftover Tuesday, a roundup of creative and tasty ways to clean out your fridge.
Egg and cornmeal pudding with refried beans

3 cups milk
1 cup fine cornmeal
4 large eggs
1 cup refried beans
1/2 teaspoon salt
1/2 teaspoon dry mustard
fresh ground black pepper
1 cup grated aged cheddar cheese


Preheat the oven to 350° and grease an 8-inch square baking pan with butter. In a bowl, beat the eggs.

Heat the milk in a saucepan over high heat until almost boiling. Turn the heat down to medium and slowly whisk in the cornmeal. Cook for 5 minutes, stirring constantly. The cornmeal and milk should have a porridge-like consistency after 5 minutes.

Remove from the heat and stir in the beaten eggs, refried beans, salt, mustard, black pepper to taste, and half the cheese. Pour the combined mixture into the baking pan, and bake for 20 minutes.

Sprinkle the top with the remaining cheese and return to the oven to bake for 10 more minutes, or until the pudding is firm in the center.

Cut into squares and serve hot with sour cream or salsa.

Broccolini and cauliflower soufflé

We are still on a light vibe at home – for this “King of the Fortnight” (an event for blogs written in Portuguese) I needed to prepare a dish with cauliflower. I searched for light and healthy recipes and ended up with 2 that sounded good – this soufflé is one of them.I love soufflés and even though this is a lighter version I wasn’t disappointed with the result – the only problem was to

Saturday, June 23, 2007

Lisa's Refried Beans

There are as many versions of refried beans as there are cooks. My recipe might not be the most traditional, but I've perfected it over the years to suit my tastes. As my regular readers will expect, it is an accordingly fiery varation. Simply cut down on the peppers and spices if you can't take the heat. If you are hooked on heat like me, increase the number of hot peppers and amount of cayenne.

Lisa's Refried Beans
These refried beans make a perfect filling for a tortilla wrap. Add some shredded lettuce, grated cheese, sour cream and a bit of hot sauce for a satisfying lunch or dinner.

Lisa's Refried Beans
Lisa's Classic Refried BeansLisa's Classic Refried Beans
Recipe by
Cuisine: Mexican
Published on June 23, 2007

One of my oldest and tried-and-true recipes — Mexican refried beans packed with spice and flavor

Print this recipePrint this recipe

Ingredients:
  • 1 1/4 cups dried pinto beans
  • 1/2-inch piece fresh ginger, minced, or 1/2 teaspoon powered ginger
  • 2 - 3 jalapeños or fresh green chilies, finely diced
  • 1 medium tomato, diced
  • 1/2 teaspoon cayenne
  • 1 teaspoon ground cumin
  • 1 - 2 teaspoons chili powder
  • 1/2 teaspoon hot paprika
  • 2 tablespoons oil or butter
  • 1 medium onion, chopped
  • 1/2 cup - 3/4 cup fresh or frozen corn
  • 1 teaspoon sea salt, or to taste
Instructions:
  • Rinse the pinto beans and soak overnight in several inches of cold water with a little yogurt whey or lemon juice added. Drain and rinse, and add to a medium saucepan and cover with several inches of fresh water. Bring to a boil, reduce the heat to low, cover, and simmer the beans for 1 hour or until very soft. Drain and transfer to a large bowl.

  • Put the tomato, ginger, jalapeños or chilies, and spices in a small saucepan. Simmer over medium-low heat for 15 minutes or until the tomato mixture begins to thicken.

  • Heat the oil or butter in a cast-iron skillet or large frying pan over medium heat. When hot, fry the onions for a few minutes. Next add the beans a few tablespoons at a time, using a fork to mash the beans.

  • Once all of the beans have been added to the pan and mashed, add the tomato mixture and corn. Stir and fry until the beans begin to dry out and brown a bit, about 10 to 15 minutes. Remove from heat, stir in the salt, and serve hot with brown rice or over warmed corn tortillas.

Makes 6 - servings
Lisa's Refried Beans

Thursday, June 21, 2007

Creamy coleslaw

Creamy cabbage coleslaw is something that everybody likes, and it only takes about 20 minutes to throw together this classic summer salad. Like almost everything I make, I like to add at least just a bit of a spicy kick to dress things up, in this case with a dash of cumin and chili, but feel free to leave these out if you prefer the traditional flavour. Red or green cabbage work equally well, but red cabbage will give your slaw a colourful visual appeal in addition to the flavour. I've submitted this recipe to Sass & Veracity who is co-hosting a salad 'Stravaganza with La Mia Cucina.
Creamy coleslaw

1 small head of cabbage, chopped, about 4 cups
1 large carrot, peeled and shredded
1 stalk celery, chopped
1/2 medium onion, chopped
2 green onions, thinly sliced, both white and green parts
3 tablespoons fresh parsley, coarsely chopped
1/2 cup mayonnaise
1/4 cup sour cream
2 teaspoons Dijon mustard
2 teaspoons fresh lemon juice
1 teaspoon sugar
1/4 teaspoon sea salt
1/2 teaspoon celery seed
generous dashes of ground cumin and chili powder
fresh ground black pepper to taste


Add the cabbage, carrot, celery, onion, green onions and parsely to a large bowl. In a separate bowl, mix all the other ingredients in the dressing, then pour over the vegetables and toss until everything is evenly coated.

Transfer to a salad bowl. Cover and refrigerate for at least 1 hour to blend the flavours.

Tuesday, June 19, 2007

Peanut Butter Chocolate Cake

This past Sunday was Father's Day and I wanted to make a special treat for my Dad. As I couldn't immediately decide what to make, I visited Culinary Concoctions by Peabody. Asides from some top notch photography, Peabody presents some highly decadent and irresistible creations. In a matter of moments, I found an answer. Peanut butter and chocolate! Accordingly, I made Peabody's Peanut Butter and Chocolate Cake.

Peanut Butter Chocolate Cake

1/4 cup of unsalted butter
1 cup of unbleached white flour
1/4 teaspoon of baking soda
1/4 teaspoon of baking powder
1/4 teaspoon of salt
1/2 cup tightly packed brown sugar
1/3 cup of peanut butter
1 large egg
1 egg yolk
1/4 cup of sour cream
1/4 cup of hot water
1/2 teaspoon of vanilla
1/2 cup of semi sweet chocolate


Grease a 9 X 13 inch baking pan and line with parchement paper.

Combine flour, baking powder, baking soda and salt in a medium sized bowl.

In a large bowl, combine the brown sugar, peanut butter and butter. Beat with an electric mixer for about 2 minutes. Next add the egg and egg yolk and beat for another 2 minutes.

Now add half of the flour mixture, and mix until well combined, about 30 seconds. Then add the sour cream and mix for another 20 - 30 seconds. Gradually add the remaining flour, along with the hot water, and mix on low speed for another 30 seconds or so. Add the vanilla, mix for about 10 seconds, and then fold in the chocolate with a rubber spatula until all of the ingredients are well combined.

Transfer the cake batter to the prepared pan and bake in a preheated 325 degree oven for about 20 - 25 minutes. Let the cake cool for about 20 - 30 minutes before adding the icing.

Chocolate Peanut Icing

2/3 cup of semisweet chocolate
1/2 cup of heavy cream
1/8 cup of granulated sugar
1 tablespoons of unsalted butter
2 tablespoons of peanut butter


Put the chocolate in a medium sized bowl and set aside. In a heavy saucepan, combine the cream, sugar, butter and peanut butter over medium heat. Once the sugar has disolved and the butter has melted, bring the mixture to a boil. Pour the cream mixture over the chocolate, wait 5 minutes, and then stir the mixture until smooth and well combined. Place the icing in the fridge for about 5 - 10 minutes, and then pour the icing into a pipe bag.

To complete the cake, cut the cake into small square pieces. Place one piece onto a plate, pipe the icing just around the edges of the piece of cake. Place another piece of cake on top, pipe the icing just around the perimeter again and then top with one last piece of cake.

Note: If you don't have a pipe bag, you can use a ziplop bag. Simply cut a small corner of the bag off and squeeze the icing out onto the cake.

Monday, June 18, 2007

Blueberry Raspberry Pudding Cake

If you are looking for a quick and easy dessert that can be made up ahead of time, I highly recommend this berry pudding cake. It is good hot or at room temperature. If you do prepare the pudding ahead of time, and want to serve it hot, simply heat it up in the oven for about 20 minutes before serving. I've used a combination of blueberries and raspberries here, but any combination of berries can be used. One of these days I'm going to make it using fresh cherries.


Blueberry Raspberry Pudding Cake

1 cup of fresh or frozen blueberries
1cup of fresh or frozen raspberries
1 teaspoon of ground cinnamon
1 teaspoon of fresh lemon juice
1 cup of unbleached white flour
3/4 cup of sugar
1 teaspoon of baking powder
1/2 cup of milk or plain yogurt
3 tablespoons of unsalted butter, melted

Topping

3/4 cup of sugar
1 tablespoon of cornstarch
1 cup of boiling water


Toss the blueberries and raspberries with cinnamon and lemon juice. Place in a greased 8 inch baking pan. In a bowl, combine flour, sugar and baking powder. Stir in the milk and butter. Spoon the batter over the berries. Combine the sugar and cornstarch. Sprinkle over the batter. Slowly pour boiling water over the entire dish. Bake in a 350 degree oven for 45 - 50 minutes.

Sunday, June 17, 2007

Mushroom Pulao Rice

I had a craving for some mushroom rice the other day, and did a quick search on the internet for some ideas. The following dish is adapted from a Spicy Mushroom Pulao recipe I found here. This may be the first time I have made this rice, but it's already a favourite.
Mushroom Pulao Rice

1 cup of Basmati Rice
2 cups of water
1 - 2 tablespoons of olive oil

For spice paste:
1 medium clove of garlic, finely minced
1/2 inch piece of ginger, finely chopped
1 - 2 green chilies, finely chopped
dash of ground cloves
dash of ground cinnamon

1 small bay leaf
1/2 inch piece of cinnamon stick
1 clove or a dash of ground cloves

6 - 7 mushrooms, chopped
1 small onion, finely chopped
1 small tomato, finely chopped

1/4 teaspoon of turmeric
1/2 teaspoon of chili pepper
1/4 teaspoon of cayenne
1/2 teaspoon of garam masala powder
sea salt to taste

parsley or cilantro for garnishing


Wash the rice and soak for a few hours in the water. Just before starting the dish, drain the rice in a strainer, reserving the soaking water.

Using a mortar and pestle, make a paste with the garlic, ginger, chilies, cloves, cinnamon and a wee bit of water. Set aside.

In a medium sized pot, heat the oil and add the bay leaf, cinnamon stick and clove. Fry for a few seconds, and then add the spice paste and stir and fry for about a minute. Next add the onion and fry until it begins to brown.

Add the tomatoes to the pot, along with the mushrooms and saute for a few minutes. Then add the powdered spices and salt, and cook for another 2 - 3 minutes. Add the drained rice, stir and fry for 1 - 2 minutes, and then add the reserved water. Bring to a boil, immediately reduce the heat to low, cover and cook until the water is absorbed - about 15 - 20 minutes. Remove from the heat and let sit for five minutes. Fluff with a fork, and garnish with the parsley and cilantro.

Friday, June 15, 2007

Indian Style Spicy Mung Beans (Moong Dal)

mung bean spicy dalI realized just the other day that I've only once put up a recipe for mung beans since I started this blog, a strange thing since this small, beautiful gold-green legume is one of my favourites. Native to India, it seemed appropriate then to come up with an Indian style spicy mung bean dish. Although Indians usually eat mung beans split into dals, I like to cook them whole in a dry texture finish so that the plump, tender beans stand out by themselves… and besides, they take no longer to cook than the split version anyway. Serve with vegetables, an Indian rice dish such as Simple Pulao Rice or Piquant Lemon Rice and an Indian flatbread for a complete and satisfying meal.

Indian Style Spicy Mung Beans (Moong Dal)Indian Style Spicy Mung Beans (Moong Dal)
Recipe by
Cuisine: Indian
Published on June 15, 2007

A simple, colorful and spicy Indian curry featuring mung beans.

Print this recipePrint this recipe

Ingredients:
  • 1 cup whole dry mung beans
  • 2 teaspoons ghee or a combination of butter and oil
  • 1 teaspoon cumin seeds
  • 1-2 teaspoons turmeric
  • 1/2 teaspoon cayenne
  • 1/2 tablespoon ground coriander
  • 1 teaspoon ground cumin
  • 1 medium onion, finely sliced
  • 1-inch piece of ginger, grated or finely chopped
  • 3-4 jalapenos green chilies, finely chopped
  • 1 large tomato, diced
  • 1 teaspoon sea salt, or to taste
  • fresh ground black pepper
  • 1/4 cup fresh parsley or cilantro, chopped
Instructions:
  • Rinse the mung beans under cold running water and place in a bowl. Cover with several inches of cold water and soak for 6 hours or overnight. Drain, rinse, and set aside.

  • Heat the ghee or butter and oil in a large pot over medium heat. Add the cumin seeds, and stir and fry for a minute or two. Next add the ground spices, stir for about 15 seconds, and then add the onion, ginger and green chillies to the pan. Fry until the onion wilts and begins to brown.

  • Add the mung beans and and 1 1/2 cups of water to the pot. Bring to a boil, immediately reduce the heat and simmer, partially covered until the beans are just tender, about 20-30 minutes. Add more water if necessary just to keep the beans covered.

  • Now add the tomato, salt and pepper. Simmer for another 15-20 minutes or until the beans are soft and the liquid is mostly absorbed. Taste for seasoning, then stir in the parsley near the end of the cooking time. Serve hot with fresh cooked rice or Indian flatbreads.

Makes 4 servings

Thursday, June 14, 2007

Lemon-Rice Fiddlehead Soup

It must have been a cold spring out East this year, because the fresh ostrich fern fiddleheads from the Maritimes are still showing up at my local market. It's summer now in Ontario, but I still relish this unique flavour of spring that some describe as a slightly nutty cross between asparagus and artichokes, and others as something like okra or broccoli. However you describe fiddleheads though, they are entirely distinctive in both taste and texture and deserve to be cooked simply without any other strong flavours to detract from the fiddlehead experience. This lovely lemon rice fiddlehead soup is easy to make and lets the fiddleheads shine through the mild flavours of lemon and rice.

To prepare fiddleheads, rinse them under running water and rub off the papery outer layer if it is still attached. Cut off the brown ends right before cooking, about a half inch from the head. If you are not going to cook them for a while after cutting off the stems, soak them in cold water.
Lemon-rice fiddlehead soup

1 lb. fiddleheads
6 cups vegetable stock, or water seasoned with a little celery seed
1 large onion, chopped
1/2 cup uncooked white rice
1/2 cup fresh lemon juice
salt
freshly cracked black pepper


Cover the fiddleheads in water in a saucepan and bring to a boil. Cook for five minutes, then drain and set aside. (Don't worry that fiddleheads are supposed to cook for at least ten minutes — they will cook more later.)

Bring the vegetable stock or seasoned water to a boil in a large saucepan. Add the onions and rice, cover, and reduce the heat to low. Simmer for 20 minutes.

Stir in the lemon juice and fiddleheads and raise the heat slightly, being careful not to let the mixture boil again. Simmer thoroughly for at least ten minutes, then add salt to taste.

Serve hot or warm.

Orange choc chip muffins


I haven’t cooked or baked much these days – husband and I are trying to lose some weight so our dinners are pretty much salad + grilled beef for him and salad for me, sometimes an omelet, too. Nothing fancy.
There was a holiday here last week and we went to the beach to hang with my family. I cooked a bit there but didn’t take any photos. It was a lot of fun because I had the most special

Wednesday, June 13, 2007

Classic Macaroni and Cheese

I'm away from home for a bit, but I haven't stopped cooking. For the past few days, I've been making my culinary creations in my parent's fine kitchen. But every cook needs a break, and tonight I'm proud to present good old fashioned macaroni and cheese, made by my Dad. Or at least, it's nearly a classic version, as I requested my Dad substitute cornmeal for the bread crumbs. It was so good, I've decided to submit the recipe to Ruth who hosts Presto Pasta Night every Friday.
Mom's Classic Macaroni and Cheese

2 cups of uncooked macaroni
4 tablespoons of butter
1 small onion, finely chopped
1/2 teaspoon of sea salt
3 tablespoons of unbleached white flour
1/2 teaspoon freshly cracked black pepper
2 cups of milk
1 cup of shredded cheddar cheese

1 tablespoon of butter
1/2 cup of bread crumbs or cornmeal
1/4 cup shredded cheese


Cook the pasta, drain and set aside.

In a medium-sized saucepan, melt the butter and then stir in the onions, flour, salt and pepper. Add the milk and cook and stir until sauce boils and thickens. Next add the cheese and stir to melt. Combine with macaroni and then transfer to a 2 quart (2 litre) casserole dish.

In a small saucepan, melt the butter. Remove from the heat and stir in the bread crumbs or cornmeal until well combined. Add the cheese, stirring well. Sprinkle over the top of the pasta in the casserole dish. Bake in a 350 degree oven for 30 minutes or until the cheese is melted and begins to brown.

Tuesday, June 12, 2007

Cherry Corn Scones

I had some cherries left over after making Cherry-Vanilla Ricotta Muffins the other day, so I decided to make some Cherry Corn Scones to fill out a meal of leftovers. I ate them for breakfast this morning as we didn't eat them all for dinner. These scones are filling and very easy to make. Any type of berry or current can be used instead of cherries. For a spicy scone, omit the cherries, add some finely chopped jalapenos, along with some ground chili powder and a cup of shredded extra old cheese.
Cherry Corn Scones

1 cup of unbleached white flour
1 cup of cornmeal
2 teaspoons of baking powder
1/8 teaspoon of baking soda
1/2 teaspoon of salt
3 tablespoons of sugar
6 tablespoons of cold, unsalted butter
2/3 cup of buttermilk
1 large egg
1/2 cup of fresh or dried cherries, finely chopped


Grease a baking sheet with butter or oil.

In a large bowl, combine the flour, cornmeal, baking powder, baking soda, salt, and sugar. Cut in the butter with a pastry cutter or two knives until the butter is broken into little tiny pieces.

Put the buttermilk in a small bowl or 2 cup measuring cup. Add the egg and beat gently with a fork or small whisk until well blended.

Make a well in the center of the dry ingredients and then pour in the buttermilk mixture, and add the cherries. Stir until just combined.

Using a greased ladle or 1/3 cup measuring cup, scoop some batter from the bowl and drop it onto the baking sheet. You will have about 6 - 8 scones, depending on how large you want them. Leave at least an inch between each scone.

Bake in the center of a 375 degree preheated oven for about 20 minutes, or until the scones begin to brown. Cool on a wire rack for 15 minutes before serving.

Monday, June 11, 2007

Chili Tortilla Scramble

When I was younger, I used to skip breakfast most of the time. I've since grown wiser, and now recognize that breakfast is the most important meal of the day. Considering most people expend more energy during the day than in the evening, it just makes sense to consume more calories in the morning than at supper time. A well-rounded breakfast provides the essential nutrients to help us get through the day.

Relieved of the daily hassles of morning labours, the weekend is the time for new and fun breakfast ideas. Breakfast is often served around noon here on Sundays, and if I owned a restaurant, I'd definitely serve breakfast all day. I came across this zesty looking Tex-Mex-style egg scramble while browsing through Mollie Katzen's Sunlight Café on Saturday so, being a sucker for lots of hot chili peppers, I of course had to try it on Sunday. Once the preparations are finished, which can be done the day before, it's a fast and easy scramble all the way from the frying pan to the plate. You can use canned pinto beans, or soak 1/3 cup dried pinto beans the morning before making the scramble, cook them in the evening, and drain and set aside for the next morning.
Chili tortilla scramble

1 cup cooked pinto beans
2 tablespoons olive oil
4 green onions, both white and green parts, finely sliced
4 large jalapeno peppers, keeping the seeds if desired, and minced
2 large red hot lady finger peppers, as above
1 teaspoon chili powder
1/4 teaspoon sea salt
3 large corn tortillas, cut in half and sliced into 1/2 inch strips
4 cloves garlic, minced or crushed
6 large eggs
1/2 cup shredded Monterey Jack cheese
cherry tomatoes for garnish


In a large frying pan or wok, heat 1 tablespoon of the olive oil over medium-high heat. When hot, add the white parts of the green onion and stir fry for a minute or until the onion begins to turn brown at the edges. Stir in the rest of the green onion, chilis, chili powder and salt, and continue to stir for five minutes, adding a little more olive oil if the food sticks to the pan.

After 5 minutes, add the rest of the olive oil, followed by the garlic and tortilla strips. Stir and cook for another five or ten minutes, or until the chilis are tender and the tortillas have turned golden brown. Gently stir in the beans.

Whisk the eggs in a bowl and pour into the pan. Scramble them into the tortilla mixture just until the egg pieces become dry, a few minutes. Remove from the heat and let stand for a minute to let the eggs completely cook themselves in their own heat.

Serve hot, topped with shredded Monterey Jack cheese and cherry tomatoes.

Giant stuffed steak

I was looking for something on my other blog archives when I saw a stuffed pork loin I made last year. Then I decided to make something similar, using beef instead.There’s a dish here called “bife à rolê” that my husband likes a lot – steaks are filled with chopped carrots, bacon and green olives, secured with toothpicks and cooked in a simple broth (most people here use a pressure cooker for

Saturday, June 9, 2007

Cherry-Vanilla Ricotta Muffins

Unlike Lucy, I've yet to make my own ricotta cheese, but these muffins were delicious nonetheless. Once again I've consulted Mollie Katzen's Sunlight Café for inspiration. Her description of these muffins pretty much sums them up:
Imagine a muffin that took Italian cheesecake lessons. In all seriousness, that's what these taste like.
I paid a small fortune for fresh cherries, as the local variety are not yet in season, but it was worth every dime. Serve them up at any time of the day.
Cherry-Vanilla Ricotta Muffins

2 cups of unbleached flour
1/2 teaspoon of salt
1 1/2 teaspoons of baking powder
1/8 teaspoon of baking soda
1 tablespoon of grated lemon zest
1/2 cup of sugar
1 cup of ricotta cheese
1 cup of buttermilk
2 large eggs
1 tablespoon of fresh lemon juice
1 tablespoon + 1 teaspoon of vanilla extract
4 tablespoons of unsalted butter, melted
1 1/2 cups of cherries (fresh or frozen, undefrosted), pitted and sliced, or 1 cup of dried cherries


Grease 12 standard sized muffin cups.

Combine the flour, salt, baking powder, baking soda, lemon zest and sugar in a large bowl. Make a well in the center.

In a medium-sized bowl, beat together the ricotta and buttermilk. Add the eggs, one at a time, beating well with a metal whisk after each addition. Then, beat in the lemon juice and vanilla.

Pour the ricotta mixture, along with the melted butter and the cherries, into the dry ingredients. Using a rubber spatula, stir from the bottom of the bowl until the dry ingredients are just moistened. Take care not to overmix.

Spoon the batter evenly into prepared muffin cups. Bake in a 350 degree oven for 20 - 25 minutes, or until lightly browned on the top and a cake tester or toothpick inserted into the middle of a muffin comes out clean. (If you are using frozen cherries, the baking time will be a little longer because the cherries contain more liquid). Let the muffins stand in the pan for 5 - 10 minutes, then transfer to a metal rack to cool. Wait at least 30 minutes before serving.

Thursday, June 7, 2007

Vegetarian Miso Soup

Joanna's Food is hosting the next Heart of the Matter roundup. The theme this month is vegetables, so I've decided to submit a vegetarian version of miso soup. Miso soup is Japanese in origin, traditionally consisting of a fish stock called dashi and, of course, miso. Often tofu is added for texture and body, but I have heeded the warnings of Sally Fallon, and so rarely consume tofu. Any combination of vegetables can be used for this soup, which makes this a perfect recipe if you have an excess of vegetables on hand. Some suggestions: snow peas, celery, cabbage, peppers, onions, shallots, dried mushrooms, bean sprouts, or whatever strikes your fancy.

Make sure to add the miso to the soup at the end of the cooking time, as cooking the miso alters the flavour and reduces the nutritional benefits.
Vegetarian Miso Soup

6 cups of water
5 tablespoons of tamari or soy sauce
1 teaspoon of sesame oil
freshly ground black pepper
2 tablespoon of finely minced ginger
2 thinly sliced carrots
5 fresh mushrooms, roughly chopped
2/3 cups of fresh peas
3 small leeks, finely chopped
a generous handful of green beans, chopped into small pieces
1 large potato, finely diced
4 chopped green onions - reserve some for garnishing
4 tablespoons of black miso dissolved in a 1/2 cup of hot water
1/2 - 1 teaspoon of sea salt


Put all of the ingredients, except the miso and salt into a large pot and bring to a boil. Reduce the heat to medium low, cover and simmer for about 7 minutes, or until the vegetables are just tender. Turn off the heat and stir in the miso paste. Test for seasoning, adding salt if necessary. Serve with bits of green onions sprinkled over top.

Wednesday, June 6, 2007

Walnut camafeus

For this Monthly Mingle, I wanted to make something Brazilian – brigadeiro crossed my mind. But I decided to make something a little bit fancier and prettier.Camafeus are bite-sized sweets served in parties here, especially weddings - it is a Portuguese candy that has become part of our cooking traditions.I tried to find more info about the origin of camafeus but didn’t – I read many, many years

Tuesday, June 5, 2007

Yunnan Stir-Fried Azuki Beans and Green Pepper

Yunnan Stir-Fried Azuki Beans and Green Pepper
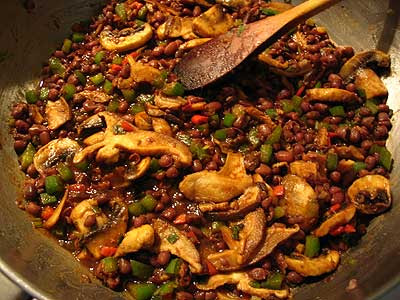
The small azuki bean is widely cultivated throughout China where it is known as hungdo, or simply "red bean," as well as in Korea and Japan. In all Asian cuisines, it is almost always eaten as part of sweet desserts or boiled and puréed with sugar to make red bean paste as a stuffing for pastries. On the other hand, savory dishes featuring the azuki bean as the main ingredient are quite rare, but fortunately this recipe from Yunnan Province in southwestern China provides an absolutely delicious and simple-to-prepare example of using the bean as a meal. Like many Chinese dishes, there is a wonderful (and, according to the Chinese, healthy) contrast in colors.

I've made this stir-fried azuki and green pepper many times now, and my guests are always ecstatic to find out that it will be served. Like so many of my favorite recipes, I've modified it from my indispensable and well-thumbed copy of Madhur Jaffrey's World Vegetarian, in this case to make it spicier, more savory, and more "mushroomy". I've used some white mushrooms along with the dried shiitakes (also known as Chinese black mushrooms), but if you want it to be absolutely authentic, substitute more shiitakes for the white mushrooms and dispense with the cayenne. As for myself, though, I'm sticking with the cayenne.

Yunnan Stir-Fried Azuki Beans and Green Pepper Hungdo Chow Ching Jiao (Yunnan Stir-Fried Azuki Beans and Green Pepper)
Recipe by
Adapted from Madhur Jaffrey's World Vegetarian: More Than 650 Meatless Recipes from Around the World
Cuisine: Chinese
Published on June 5, 2007

A simple, colorful and delicious Asian-flavored azuki bean stir fry loaded with mushrooms and crunchy fresh peppers

Print this recipePrint this recipe

ngredients:
  • 1 cup dried azuki beans
  • 1/2 oz dried shiitake mushrooms
  • 2 tablespoons sesame oil
  • 3 green onions, sliced
  • 1 green pepper, seeded and diced
  • 2 fresh green chilies, seeded and diced
  • 6 white mushrooms, sliced
  • 3 cloves garlic, crushed or minced
  • 4 tablespoons tamari or soy sauce
  • 3/4 teaspoons sugar
  • 1/4 teaspoon cayenne
Instructions:
  • Rinse the beans and soak for 6 hours or overnight in several inches of water. Drain and rinse, and transfer to a medium saucepan. Cover with several inches of fresh water and bring to a boil. Reduce the heat to low, cover, and simmer for 40 to 60 minutes or until the beans are tender. Drain, and then crush some of the beans lightly with the band cover, simmering for about 1 hour or until the beans are soft. Drain the beans, and then crush some of them lightly with the back of a wooden spoon. Set aside.

  • Meanwhile, soak the dried shiitake mushrooms in hot water for 30 minutes. Drain and set aside.

  • Heat the sesame oil over high heat in a large wok or saucepan. When hot, add the green onions and stir-fry rapidly for 30 seconds. Quickly add the mushrooms, both shiitake and white, green pepper, chilies, and garlic, and stir-fry for two minutes or until the mushrooms just start to reduce. Add the beans, turn down the heat to low, and stir to mix. Stir in the tamari or soy sauce, sugar and cayenne, and simmer gently for at least 5 minutes or until the liquid has reduced slightly and the mixture has a fairly dry texture.

  • Serve over hot brown rice with plain vegetables or a green salad on the side.

Makes 4 servings
Yunnan Stir-Fried Azuki Beans and Green Pepper

Monday, June 4, 2007

Nutella filled cookies


My husband is not into sweets but he tells everybody about the cakes, cookies and other stuff I make. It’s funny because I don’t even know more than half of those people. :)

When I started going to his dentist, the receptionists who work there kept asking me about my recipes, sweets, etc.
“Joao says they’re wonderful” – said one of the girls. “But he won’t even try them”, I replied. That was

Sunday, June 3, 2007

Spicy Baked Egg Muffins

Spicy Baked Egg Muffins
Another weekend, another delicious breakfast idea from Mollie Katzen's gorgeous and original breakfast cookbook, the Sunlight Café. These baked egg and ricotta cheese muffins are loaded with good proteins and other nutrients to get you started on the day, and, with the addition of cayenne and jalapeño peppers, they pack the spicy flavour that I like for kicking off just about anything. Once they cool down a little, they also make portable little snacks. Make sure you use whole milk ricotta.

This also turned out to be a perfect creation to submit to The Spice Who Loved Me, who will be hosting the next Weekend Breakfast Blogging event. I'm really looking forward to this, as the theme is spice!

Spicy Baked Egg MuffinsSpicy Baked Egg Muffins
Recipe by
Adapted from Mollie Katzen's Sunlight Café
Published on June 3, 2007

Delicious, colorful and spicy baked egg muffins — great for breakfast or as a snack

Print this recipePrint this recipe

Ingredients:
  • cornmeal
  • 8 large eggs
  • 1 cup ricotta cheese
  • 1/2 teaspoon cayenne
  • 1/2 teaspoon sea salt
  • 2 green onions, white and green parts, sliced
  • 1/4 cup coarsely chopped grape or cherry tomatoes
  • 1 large jalapeño, minced
  • fresh ground black pepper
  • fresh grated Monterey Jack cheese
Instructions:
  • Preheat an oven to 350°. Grease 8 cups of a standard (2 1/2-inch diameter) muffin tray with butter. Put the tray in the preheated oven for a minute to melt the butter. Remove, and spoon a little cornmeal into each greased cup, just enough to cover the bottom.

  • Pour the eggs, ricotta cheese, cayenne and salt into a blender and beat until smooth. Stir in the green onions, tomatoes, jalapeño and plenty of fresh ground black pepper.

  • Pour the egg mixture into each muffin cup, filling them right to the rim. Bake in the center of the oven for 10 minutes, then remove and sprinkle on a little of the grated Monterey Jack cheese on each muffin. Return to the oven and bake for about 12 more minutes, or until the puffed-up tops are just starting to turn golden and are slightly firm to the touch.

  • Remove the tray from the oven and let cool for five minutes. Run a knife around the edges to loosen, and lift or invert each muffin onto a plate.

  • Serve hot, warm or at room temperature by themselves, or with hot pepper sauce, salsa, yogurt or sour cream.

Makes 8 egg muffins
Spicy Baked Egg Muffins

Saturday, June 2, 2007

Staple Corner: Ranch Dressing

Homemade Ranch Dressing
After five days of sweltering heat outside, temperatures and tempers have finally reached the simmering point right here in my kitchen - even the butter has melted down in its dish. Time for an undemanding, light meal that, most importantly, doesn't involve any cooking. A baby spinach salad with lots of fresh vegetables and goat's cheese along with a nice French baguette from the market will go a long way today, even if just slicing the salad ingredients had me sweating.

This ranch dressing takes minutes to prepare and has a cool, refreshing and authentic flavour that will go well with any green salad on a summer's day. You can use it as a delicious dip for fresh cut vegetables as well.

Ranch dressingHomemade Ranch Dressing
Recipe by
Published on June 2, 2007

A fast and simple homemade ranch dressing that's cool, refreshing and has a wonderful authentic flavor

Print this recipePrint this recipe

Ingredients:
  • 4 teaspoons olive oil
  • 2 teaspoons rice or cider vinegar
  • 1 1/2 teaspoons sugar
  • 1/4 teaspoon dried marjoram
  • 3/4 cup buttermilk
  • 3 tablespoons plain yogurt
  • 2 tablespoons mayonnaise
  • 2 green onions, thinly sliced
  • 1 clove garlic, crushed
  • handful of fresh parsley, finely chopped
  • handful of fresh chives, finely chopped
Instructions:
  • Mix together the oil, vinegar, sugar and marjoram in a bowl. Whisk in the buttermilk, yoghurt and mayonnaise. Stir in the green onions, garlic, parsley and chives.

  • Cover and refrigerate for 4 hours or overnight to thicken. Whisk again before serving over salad greens or vegetables.

Makes 1 1/4 cups