Thursday, August 30, 2007

Wine Inspired Spicy Popcorn

The spicier the better, and that includes popcorn. Rarely do I purchase prepackaged treats, relying instead on my culinary inspired imagination and efforts. Recently, I came up with my best spice mixture to date for old fashioned stovetop popped popcorn. Popcorn goes gourmet in Lisa's Kitchen.
Spicy Popcorn

1/2 cup of unpopped popcorn kernels
1/8 of a cup of oil
1/8 of a cup of butter

1 teaspoon of dried dill
dash of mustard powder
1/2 teaspoon of cayenne pepper
1/4 teaspoon of chili powder
1/4 teaspoon of cumin powder
1/4 teaspoon of amchoor powder
1/4 - 1/2 cup of Parmesan cheese
1 teaspoon of sea salt


In a large pot, heat the oil and butter over medium-high heat until hot. Add a few kernels of popcorn to the pot. When the kernels pop, add the remaining popcorn. Cover and shake the pot up and down every 15 - 30 seconds to distribute the oil and prevent the popped kernels from burning.

To make the seasoning, combine the spices, cheese and salt in a small bowl.

Transfer the popcorn to a large bowl and lightly toss with the spice mixture.

Almost Greek salad


Yep, almost Greek. Because I used a different type of cheese to replace feta – queijo Minas frescal. And I used lime juice in the dressing, instead of red wine vinegar.

The verdict? I had a huge bowl of this salad. HUGE. I mean it – it was all I had for lunch, with a glass of wine. Ok, 2 glasses of wine. :)

I still want to try it with feta, but my Brazilian twist worked so well I’m submitting

Wednesday, August 29, 2007

The Daring Bakers present: Milk Chocolate and Caramel Tart

Chocolate and caramel – a match made in heaven. That’s what I thought when Veron showed me this recipe – she was the host of this month’s challenge and asked me to be her partner in crime – thanks, sweetie! :)We exchanged emails with many suggestions for the challenge but truth be told, who can resist this tart? I couldn’t, and didn’t.The tart is delicious, but not as rich as I thought it would

Tuesday, August 28, 2007

Chickpea, Chili and Coriander Soup

This spicy, blended chickpea soup from Delia Smith's Vegetarian Collection is hearty enough to serve as a main dish in a meal along with vegetable and grain side dishes, but tastes light enough with the lemon and coriander accents to make a light summer meal as well. As usual, I've kicked the recipe up a gear with extra chilli peppers, but even so the added heat won't deter anyone from this refreshing zesty soup.
Chickpea, Chili and Coriander Soup

1 cup chickpeas
1 tablespoon coriander seeds
1 tablespoon cumin seeds
1 tablespoon butter
3 large hot chillies, red or green, seeded and finely chopped
6 large cloves garlic, finely chopped
1 teaspoon turmeric
juice and grated zest from one large lemon
handful of fresh coriander, stalks and leaves separated, with the leaves finely chopped
1/4 cup crème fraîche or plain whole-fat yogurt
1 teaspoon sea salt
fresh ground black pepper

To garnish:

1 large hot chili, red or green, seeded and cut into very fine strips
chopped fresh coriander leaves (see above)


Soak the chickpeas overnight in 5 cups of water with a little yogurt whey or lemon juice. Bring to a boil in a large saucepan, then cover and reduce the heat to low, simmering for about 1 1/2 hours until the chickpeas are very tender.

While the chickpeas are cooking, the rest of the ingredients can be measured, cut and prepared. Pre-heat a small frying pan over medium heat and toss in the coriander and cumin seeds. Dry-roast the seeds for 2 or 3 minutes, or until they become aromatic and begin to brown. Remove the seeds into a mortar and crush with a pestle.

Put the frying pan back on low heat and melt in the butter. Add the crushed spices along with the chillies and garlic, and stir-fry for about 5 minutes. Add the turmeric, stir and heat for another minute before removing the pan from the heat. Set aside.

When the chickpeas are cooked, drain them in a colander placed over a large bowl to reserve the cooking liquid. Pour the chickpeas into a blender along with a couple of cups of the cooking liquid, and pureé until smooth. Add in the chilli, garlic and spice mixture from the frying pan along with the lemon zest and coriander stalks, then pureé again until everything is blended and smooth, adding a little more reserved cooking liquid if necessary.

Pour the mixture back into the saucepan and stir in the rest of the reserved cooking liquid. Bring everything up to a gentle simmer and let it heat gently for 30 minutes, stirring occasionally and adding more water if a thinner soup is desired.

Before serving, stir in half the crème fraîche or yogurt, as well as the lemon juice, salt and pepper. Taste for seasoning, then serve hot with a spoonful of the rest of the crème fraîche or yogurt swirled into each bowl, and scatter with coriander leaves and fine strips of chilli for garnish. Serves 6.

White Bean Risotto (Risotto al Fagioli)

White beans add a surprisingly fresh flavour to risotto, and this risotto with beans, herbs and fresh asiago cheese is so hearty and packed with proteins that it's basically a meal all by itself, and a very refreshing and satisfying one accompanied by a light salad of greens and vinaigrette. I use navy beans in my risotto al fanioli, but any white bean such as cannellini, great northern or white kidney will do just as well.
White bean risotto

3/4 cups navy beans
3 1/4 cups water
bay leaf
dash celery seed
1 tablespoon olive oil
1 medium onion, chopped
2 tablespoons pine nuts (optional)
1 large tomato, chopped
2 cloves garlic, crushed
1 1/2 cups arborio rice
1/4 cup vermouth
1/3 cup fresh grated asiago cheese
2 tablespoons chopped fresh basil
1/4 teaspoon dried oregano
1/4 teaspoon dried thyme
1 teaspoon sea salt, or to taste
fresh ground black pepper


Soak the beans overnight in water with a little yoghurt whey or lemon juice. The next day, at least a couple of hours before starting the risotto, bring the beans and water to a boil, then reduce heat to low and cover, cooking for 1 hour or until the beans are tender. Drain and let cool.

Heat 3 1/4 cups water to a simmer along with a bay leaf and some celery seed in a medium sized saucepan while you cook the other ingredients.

Meanwhile, heat a large saucepan over medium heat. When hot, add in the olive oil, wait a few seconds, then swirl around the bottom of the pan. Add the onion and pine nuts if using and sauté for about 4 or 5 minutes until the onion is soft. Stir in the tomato and garlic and cook for another 2 or 3 minutes.

Add the rice and stir around to coat the grains. Turn down the heat slightly and pour in the vermouth, stirring regularly until the liquid is absorbed.

Add a ladleful of the hot water to the pan and cook gently, stirring occasionally to prevent the rice from sticking to the pan, until the liquid is again absorbed. Stir in more liquid as each ladleful is absorbed. Continue this process until the risotto is thick and creamy — about 25 minutes. The rice should be tender, but firm to the bite.

Just before serving, stir in the drained beans, most of the asiago cheese, and the herbs and salt and pepper. Adjust the seasonings if necessary. To serve, sprinkle with the remaining cheese and a few torn basil leaves.

Sunday, August 26, 2007

Mushroom Methi Curry with Basmati Onion Rice

Regular readers know how much I adore mushrooms, especially curried mushrooms. I've made a few different variations in the past, including Mushrooms with Coriander and Cumin. I recently discovered a new favorite, thanks to Nandita of Saffron Trail. I made a few slight variations on her simple Mushroom Methi Curry and served it along with Onion Rice as suggested. To fill out the meal, I also served Mung Beans and Cottage Cheese (recipe coming soon). I was told my kitchen smelled like an Indian restaurant, and the meal received rave reviews.

Mushroom Methi Curry

1 package of button mushrooms (about 15 mushrooms)
2 teaspoons of oil or a combination of butter and oil
1/2 teaspoon of fenugreek seeds
1/2 teaspoon of mustard seeds
1 small handful of dried curry leaves (or a few fresh curry leaves)
a few dashes of fenugreek powder


For the Curry Paste:

1 - 2 teaspoons of oil
1 teaspoon of cumin seeds
2 cloves of garlic, crushed
1/2 inch piece of ginger, finely chopped
2 jalapeno peppers, finely choppd
3 large shallots, or 1 small onion, sliced
1 teaspoon of coriander seeds
3 dried red chillies
1 medium tomato, chopped

1 heaping tablespoon of besan (chickpea) flour
2 tablespoons of yogurt whisked together with water to make 1/2 cup
1/2 teaspoon of sea salt


Clean the mushrooms with a damp cloth and chop them into bite sized pieces. In a wok or large frying pan, heat the oil over medium-high heat until hot. Add the mustard seeds and fenugreek seeds, stirring until the mustard seeds begin to pop. Immediately add the chopped mushrooms, curry leaves and fenugreek powder. Saute until the mushrooms are nearly cooked, about 3 - 4 minutes. Remove from the pan and set aside.

In the same wok, heat another teaspoon or two of oil over medium-high heat. Add all of the ingredients for the curry paste, except the tomato. Stir and fry until the shallots are soft - about 5 minutes. Near the end of the cooking time, add the tomato and cook until the mixture begins to thicken - another 5 minutes or so. Remove from the pan and let cook for a few minutes. Grind or blend to a paste.

Whisk the chickpea flour into the yogurt milk mixture and set aside.

Now add the mushrooms to the warm wok, along with the curry paste and yogurt mixture. Simmer over medium heat for about 3 - 5 minutes to thicken. Add the salt, stir well, and remove from the heat. Garnish with fresh parsley or coriander.
As indicated above, I served the mushrooms over Simple Onion Rice.

Simple Onion Rice

1 cup of Basmati Rice
1 - 2 teaspoons of ghee, or a mixture of butter and oil
1 teaspoon of cumin seeds
2 bay leaves, crushed
1 small piece of cinnamon
4 - 5 cloves
1 small onion, thinly sliced
1/2 teaspoon of sea salt


Wash the rice well. Soak for a few hours or more in 2 cups of water. Drain the rice, reserving the soaking liquid and let the rice air dry for about 10 - 20 minutes.

In a medium-sized pot, heat the oil over medium heat until hot. Add the whole spices and stir and fry for a minute or two. Next, add the sliced onions and cook until soft or browned. Add the rice, stir for a minute and then add the water and salt. Bring to a boil, immediately reduce the heat to low and cover with a tight fitting lid. Simmer for 15 - 20 minutes or until the liquid is absorbed. Remove from the heat, let sit for about 5 minutes and fluff with a fork before serving.

Saturday, August 25, 2007

Snack Corner: Seasoned Radishes

If you're like me, you have a hard time walking past the radishes at the market without picking up a bunch, especially when they're in season — the local ones are always bigger, redder and shinier, somehow, and have just that more extra crisp and hot bite to them. And if you're like me, the radishes hardly ever make it to a recipe. Washed and trimmed, they're a perfect snack or colourful accompaniment to a summer meal all by themselves, or just with a little sea salt sprinkled on them.

But if you have guests over and want to add something a little different than ordinary radishes to your hors d’œuvres plate, or if you just want a little added taste and colour for your own snack radishes, this little idea from Madhur Jaffrey's World Vegetarian is perfect and takes hardly any more trouble than washing and trimming the radishes in the first place.

Once you've washed and trimmed a bunch of radishes, cut them lengthwise into halves or quarters, depending on how big they are, to make finger-sized pieces and put them in a small bowl. Pour 4 teaspoons of tamari sauce and a half teaspoon of red wine vinegar over them and toss to mix. Set aside for half an hour, tossing now and then. Drain and serve, or store in the refrigerator until they're to be eaten.

Friday, August 24, 2007

Brazilian candy in tiny cups: brigadeiro, beijinho and bicho-de-pé

Brigadeiro and beijinho are very popular types of candy served in parties here in Brazil - bicho-de-pé is a bit less usual, but equally adored.They all start with a can of sweetened condensed milk - something we love around here. Many of our dessert/candy recipes call for it.The difference is in the flavors: beijinho is made with coconut, brigadeiro is chocolatey and bicho-de-pé is (artificially)

Thursday, August 23, 2007

Red Kidney Bean Salad & Harissa Dressing

Try this attractive and simple bean salad if you want to make a simple and earthy but spicy dinner. The secret of the dressing is harissa, a staple chili and garlic condiment in Tunisia that I've posted a recipe for here. Black-eyed peas can be used just as easily here instead of kidney beans for a more buttery taste and a more variegated appearance.

The beans here can be cooked well ahead of time and refrigerated before putting together the salad, but they work very well in a warm salad too, letting them cool down just a little at room temperature right after cooking before adding the other ingredients.
Red kidney bean salad & harissa dressing

Salad:

1 1/2 cups dried red kidney beans
1 red onion, chopped
1 jalapeño pepper, seeded and diced
1/2 red bell pepper, seeded and cut into narrow strips
1/2 green bell pepper, as above


Dressing:

1/3 cup olive oil
juice of 1 lemon
1 1/2 teaspoons harissa
1 clove garlic, crushed
1 teaspoon ground cumin
1 tablespoon dried parsley


Soak the beans overnight covered in water and with a little bit of yoghurt whey or lemon juice. Bring to a boil, then reduce the heat to low and cover, simmering for 1 hour or until the beans are tender but still firm. (If you're using black-eyed peas, they should be cooked in 20 or 30 minutes.) Drain and set aside in a salad bowl to cool.

In another bowl, whisk together the dressing ingredients. Add the chopped onion and diced jalapeño pepper to the beans and pour the dressing over top. Mix well.

Serve warm or cold garnished with the strips of red and green bell pepper and with a salt mill on the table to grind over the servings. Serves 6.

Herb ricotta cannelloni


It's funny how we spend time with people and still don't know hundreds of things about them. Or we think we know something, but we don't (This is not a philosophical post, I promise).

I was going through a couple of books trying to choose something for lunch and suddenly João looked at a photo and said "why don't you cook this?" - I looked at him and replied "but you don't like cannelloni. And

Wednesday, August 22, 2007

Urad Dal with Tomatoes (Urad Tamatar Dal)


This simple Urad Dal Soup has long been one of my favorites. I've been making it for years, so it's a wonder I haven't made it since starting Lisa's Kitchen. Because it's one of my favorites, I'm sharing the recipe with Running with Tweezers who will be hosting The Second Annual Soup Challenge. The recipe is adapted from one of favorite cookbooks, Lord Krishna's Cuisine, by Yamuna Devi.

Popular in North India, urad dal is high in protein, and tastes best when seasoned with ginger, red chilies, turmeric, asafetida and fresh parsley or coriander among other herbs and spices. Serve with Piquant Lemon Rice, a vegetable dish and an Indian style bread for a nutritious and satisfying meal.
Urad Dal and Tomato Soup

3/4 cups of split urad dal, without skins
6 cups of water
1/2 - 1 teaspoon of turmeric
dash of cayenne pepper
3 tablespoon of ghee, or a mixture of butter and oil
3 medium-sized tomatoes, cut into large chunks
2 jalapeno or fresh chilies, finely chopped
1 1/4 teaspoons of sea salt
2 teaspoons of fresh ginger, shredded or minced
2 teaspoons of cumin seeds
2 - 3 dried red chilies, broken into bits
1/2 teaspoon of yellow asafetida powder
2 tablespooons of fresh parsley, chopped


Remove any bits of debris from the ural dal. Wash well and set aside.

Bring the water, turmeric, cayenne, and a dab of the ghee or butter and oil to a boil in a large pot. Stir in the urad dal and again bring to a boil. Reduce the heat to moderately low, cover and gently boil for about 30 minutes.

Add the tomatoes and the fresh jalapeno or hot chillies to the pot. Cover and continue to cook for another hour or until the dal is soft and fully cooked. Remove from the heat, add the salt and stir.

Heat the ghee or butter and oil in a small pot over moderately high heat. When the oil is hot, add the ginger, cumin seeds and dried red chili in rapid succession. Fry until the cumin seeds and chili turn brown. Add the asafetida powder, and after a second or two, quickly pour the fried seasonings into the dal. Immediately cover and allow the seasonings to soak into the dal for a few minutes.

Add the parsley and stir and serve.

Serves 6 - 8 people.

Tuesday, August 21, 2007

Baked Ricotta Cheese

I love to treat my father to a big, home-cooked meal from my kitchen when he comes down to visit for the weekend, but the last thing I want to do is spend a lot of time making an elaborate breakfast too if I want to spend some time with him away from the kitchen as well. At the same time, though, I like to give him something a little different than the usual cereal or eggs.

Fortunately the versatility of ricotta makes this Italian whey cheese the best friend of anyone who wants to make an impression with a unique breakfast that's also incredibly fast and simple. And what could be simpler than mixing a tub of fresh ricotta with your favourite morning flavours and throwing it on to a pan to bake?

For my breakfast with Dad, I lightly stirred in a little of his homemade maple syrup into a one-pound tub of whole fat ricotta cheese and spread the mixture out on to a lightly buttered 9-inch baking pan. The pan was then put into an oven pre-heated to 350° and left to bake for about 40 minutes or until the edges and the top just started turning golden brown. After letting the cheese cool for a few minutes, it was ready to slice and serve with some fresh blueberries and strawberries. Delicious.

Best of all, there are practically no limitations on what you can do with ricotta cheese before baking it except your imagination. You can make an equally delicious breakfast food by stirring in a 1/2 teaspoon of ground cinnamon and a dash of nutmeg, or a couple of tablespoons of jams or preserves, or even some crushed pistachios and raisins, into the ricotta before baking.

But it's not just for breakfast. Try adding a handful of chives and a 1/2 teaspoon of your favourite herbs or spices to the cheese and cutting the baked herbed or spiced ricotta into small slices for appetizers, or even smaller cubes for a decidedly different topping in a green salad. Putting the pan once it's baked under the broiler for a couple of minutes with a little sprinkled parmesan cheese over the top makes a nice touch too. Or stir in a couple of tablespoons of dark rum and some raisins to make a delicious and unique after-dinner tidbit. In other words, baked ricotta cheese works with almost any flavour combination you can think of for almost any occasion, so give it a try and let me know your favourite baked ricotta cheese idea.

Monday, August 20, 2007

Scalloped Potatoes with Wild Mushroom Soup

This past weekend I had the opportunity to cook a meal for my dad who made a trip to London to visit. After considering what to make for a few days prior to his visit, I finally settled on Scalloped Potatoes because potatoes are one of my dad's favorite vegetables. This is a variation on the recipe my mom used to make; instead of using canned mushroom soup with a bit of milk and butter, I prepared a pot of my favorite homemade Wild Mushroom Soup the night before for the potatoes. The potatoes were delicious, though the soup base was not quite as thick and creamy as I would have liked. I would suggest reducing the amount of liquid when you prepare the mushroom soup for the potatoes, or sprinkle a bit of flour over each layer for a creamier version. Serve with a light dal soup, such as Urad Dal Tomato Soup, and a salad for a satisfying vegetarian meal.

Scalloped Potatoes with Wild Mushroom Soup

3 - 4 large unpeeled potatoes, sliced
1 large onion, sliced and separated into rings
2 tablespoons of flour
salt and pepper
2 teaspoons of butter
approximately 3 - 4 cups of Wild Mushroom Soup


Cover the bottom of a medium-sized casserole dish with some of the sliced potatoes. Top with some of the sliced onion, a bit of salt and pepper, half of the butter, a tablespoon of flour and 2 cups of the soup. Repeat, reserving some of the sliced onions for the top. Finish by pouring a bit of soup over the top and sprinkle with salt and pepper. Bake, uncovered, in a preheated 350 degree oven for about an hour, or until the potatoes are tender. Serves 4 - 6 people.

Sunday, August 19, 2007

Summer Corn and Ranch salad

There's nothing like roasting fresh cobs of peaches-and-cream corn when they come into season, but I don't like to miss the opportunity to use fresh local ingredients in some other favourite corn recipes either. This light side salad is cool and refreshing on hot days and also has the unbeatable crunch of summer vegetables right from the local farm. Best of all, it hardly takes any time to make once the corn is cooked, but it's a good idea to prepare an equally fast and simple home-made ranch dressing the night before instead of using the store-bought varieties.
Summer corn and ranch salad

2 cobs of corn, roasted or boiled and then pared from the cobs
1 large tomato, diced
1/2 green bell pepper, diced
2 large jalapeño peppers, finely diced
1 stalk celery, halved lengthwise and sliced
1 small onion, chopped
1/4 cup ranch dressing, already prepared and chilled


Combine all the vegetables in a large salad bowl. Pour in the ranch dressing and toss. Chill for 1 hour before serving.

Serves 4 as a side salad.

Food for Thought - Part Two

Last Sunday I made a trip to the Covent Garden Market to check out Festa Italiana in preparation for my second post for Food for Thought, the official blog for foodtv.ca. The highlight of the event was Chef Byran Lavery's Italian cooking demonstration. Not only was the session informative, it was tasty too! Thanks to Chef Lavery. You can read about it here.

Friday, August 17, 2007

Quinoa Dolmadakia (Stuffed Grape Leaves)

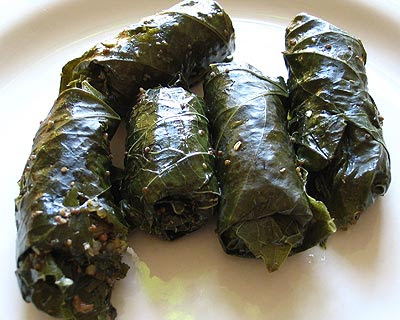
I've never been able to avoid stuffed grape leaves in Greek or Middle Eastern restaurants, but until now I've never actually tried making them. But looking for something with a Mediterranean flare to go along with my watermelon and feta salad with olives, I found the perfect excuse to try my hand at this dolmadakia recipe that I've been hoarding for years.

Instead of stuffing the grape leaves with a rice filling as is usual, this version uses quinoa to give the dolmadakia a nice, nutty flavour and slightly crunchier texture. And, as I never tire of pointing out, quinoa has a much more complete nutritional profile than rice. Mixed with herbs, shallots and pine nuts, these stuffed grape leaves are sure to fly off the plate, so double or triple the recipe for parties.

Notes: If fresh grape leaves are unavailable, which is probably the case for most of us, use jarred leaves instead of canned so that you can see inside to make sure the veins of the leaves are not too thick. And check the ingredients — grape leaves packed in brine shouldn't need preservatives that are found in many brands.

If you've never opened a jar of grape leaves before, they come rolled up in bundles of about 75 leaves each. If you're only making one, two or three batches of this dolmadakia, unroll only one bundle and leave the rest in the brine for future use. If you find leaves that are torn or have holes in them, simply discard them.

Your first effort at rolling a dolmadaki might turn out a little loose, but you will quickly learn the right amount of pressure to apply to roll the leaves without tearing. A very good visual demonstration of the folding and rolling process is found here.
Quinoa dolmadakia

1/4 cup quinoa
2 tablespoons olive oil
1 shallot, peeled and finely chopped
2 tablespoons pine nuts
2 tablespoons chives, chopped
1 tablespoon fresh parsley, chopped
2 tablespoons fresh dill, chopped, or 1 tablespoon dried
1/8 teaspoon sea salt
dash of cayenne pepper
2 tablespoons dry vermouth
18 grape leaves
1/2 cup water
dash of celery seed
dash of sea salt
juice of 1 lemon


Rinse and scrub the quinoa in a fine strainer under running water and soak overnight in a small bowl covered with water. In the morning, drain the quinoa and spread over a fine strainer to dry out the grains as much as possible, preferably many hours before beginning to cook.

Heat a small frying pan over medium heat. When hot, add 1 tablespoon of the olive oil, wait for a few seconds and then swirl around in the pan. Add the quinoa and sauté for 2 or 3 minutes until the grains start to brown. Be careful of popping and spattering, especially if the quinoa is still damp!

Toss in the shallot and pine nuts and continue to stir fry for 3 or 4 minutes, or until the pine nuts begin to brown as well. Turn down the heat to medium-low and add the chives, parsley, dill, salt and cayenee and lightly sauté for another minute as the herbs wilt. Pour in the vermouth and cover the pan with a lid, simmering until the liquid is absorbed, about 5 minutes. Remove from the heat and spread the mixture over a plate to let it cool.

While the quinoa mixture is cooling, prepare the grape leaves. If you are using fresh leaves, wash and trim the stems off the leaves. If you are using canned or jarred leaves, scald them for a few minutes in hot water in a saucepan, then drain. If necessary, trim the stems.

Pat the leaves dry and place them on paper towels with the shiny side down. Place 1 teaspoon of the quinoa mixture in the middle of each leaf. Fold the stem end of each leaf over to cover the filling, and then roll up the sides carefully (to avoid tearing the leaf) until a small compact cylinder is formed.

Put the other tablespoon of olive oil in your second smallest saucepan and arrange the stuffed grape leaves over the bottom. It is fine to layer them if your saucepan is very small. Stir in a dash of celery seed and a dash of salt into the half cup of water and pour over the grape leaves, and add the lemon juice.

Fit a slightly smaller saucepan lid or plate over the stuffed grape leaves to provide a little weight to keep the leaves from uncurling. Cover the saucepan with a lid and bring the liquid to a simmer over low heat. Cook until the liquid is absorbed, about 45 minutes. Remove, drain and cool before serving.

Garnish with lemon wedges and serve with a bowl of plain yogurt for dipping. Serves 2 to 4 people.

Parsley polenta with balsamic tomatoes


One of the bad things about living in São Paulo is the huge traffic jams I have to face every single day; it takes me forever to get to work and then to get back home. So exhausting.

I don’t know what happened in one of these days but the streets were so free that I arrived home in less then 40 minutes! A miracle! That deserved a celebration – a delicious dinner that I put together in 20

Wednesday, August 15, 2007

Brownies with Peanut Butter and Chocolate Icing

There was some icing left over from a Peanut Butter Chocolate Cake I made the other day and needless to say, I didn't want it to go to waste. Instead of making another cake, I made a batch of cocoa brownies and topped it off with what remained. These cakey brownies are so good, they don't even need any icing, but if you want the extra sugar rush, halve the recipe for the chocolate peanut icing or use your favourite icing recipe instead. Once Upon a Tart just so happens to be hosting Brownie Babe of the Month again. As this is one of the best brownie recipes I've found so far, this is my entry for the event.
Cocoa Brownies with Peanut Butter Chocolate Icing

1 cup of unbleached white flour
3/4 cup of cocoa
1/2 teaspoon of baking soda
1/4 teaspoon of salt
3/4 cup of butter, softened
1 1/2 cups of brown sugar, firmly packed
3 eggs
1 1/2 teaspoons of vanilla


Grease a 9 x 13 inch pan and set aside. Sift together the flour, cocoa, baking soda and salt in a medium sized bowl. In a large bowl, beat the butter, sugar, eggs and vanilla with an electric mixer until fluffy - about 3 - 4 minutes. Stir in the dry ingredients and beat until smooth - about 2 minutes.

Transfer the brownie batter into the prepared pan and bake in a preheated 350 degree oven for about 30 minutes. Let cool on a wire rack. When cool, top with the icing of your choice.

Caramel banana pie (and a trip down memory lane)


We have been celebrating Father's Day with a get together/lunch at my house ever since I got married, in 2005. I love it - besides my father, who is the star of the day, my brother and sister come too and they are both great people to have around (of course I'm biased. And I don't care). :)

Since I didn't want to make the same old desserts again (the sweetened condensed milk custard is my

Tuesday, August 14, 2007

Watermelon & Feta Salad With Olives

The juicy sweetness of watermelon may sound like an odd flavour to combine with feta cheese and olives, but they are all common and beloved flavours in the heat of the North African summer, from where this recipe is inspired. And, as it turns out, when mixed with coolness of some fresh mint leaves and the tartness of limes, watermelon and feta cheese and olives actually go together to make one of the most lovely, delicious and refreshing summer treats I've ever had, not to mention one of the easiest and fastest to put together. I'd go so far as to say that this salad is essential if you're having a Mediterranean-themed get-together in the summer, either right before or after the main course. Just make sure to keep it cool until it is served!

Don't be tempted to use lemon juice instead of fresh limes, as the limes make all the difference in the dressing. I prefer colossal kalamata olives over any other kind, but black olives will work in this salad as well. But if you can, find top-quality imported Greek sheep feta for its extra zing instead of domestic cow or goat cheese. If you live in or near London, the best feta and olives I've found are at the Perfect Bakery on Hamilton Road.
Watermelon & feta salad with olives

4 lbs. seedless watermelon (1 small melon or 1/4 of a large one)
8 oz. feta cheese
fresh ground black pepper
1 cup kalamata olives, pitted
2 tablespoons chopped fresh mint leaves
2 tablespoons olive oil
juice of 4 small limes


Cut the watermelon into bite-sized cubes and let sit in a strainer over a bowl in the refrigerator for an hour or more to reduce excess water.

Arrange the watermelon cubes in a large shallow serving dish. Crumble the feta cheese over the watermelon and sprinkle with fresh ground black peppers. Arrange the olives over the top and scatter the mint leaves on the salad.

Whisk together the olive oil and lime juice and drizzle over the salad. Serve right away or chilled for a short time.

Monday, August 13, 2007

Totally chocolate chocolate chip cookies


I made these cookies for one of my co-workers – she’s a secretary, too, and such a sweet person!

I was flipping through the book and couldn’t decide which recipe to bake for her – should I go with ginger? Walnuts? Peanut butter, perhaps? So many options…

Then I thought that one just can’t go wrong with chocolate, especially when it comes with more chocolate. :D


Totally chocolate chocolate

Sunday, August 12, 2007

Spicy Tomato Mushroom Rice with Fresh Mint

In the Spring, I started a little garden in some large pots in the backyard. In addition to tomatoes and jalapeno peppers, I planted various herbs, including fresh mint, parsley, bay leaves, dill, coriander and lemon grass. This rice dish includes some of the fresh mint from my little garden. I was very satisfied with the result, so I decided to share the recipe with Sharmi who will be showcasing rice dishes for the next Jihva for ingredients.
Spicy Tomato Mushroom Rice with Fresh Mint

1 cup of basmati rice
2 cups of water

1 - 2 green onions, chopped
2 - 3 jalapenos or chilies, finely chopped
1 garlic clove, finely chopped or crushed
1 inch piece of ginger, finely chopped
1/2 teaspoon of fennel seeds
1/2 teaspoon of ground cinnamon
2 black cardamom pods
dash of cayenne and turmeric

1 tomato, finely chopped
5 large mushrooms, roughly chopped

juice from one lemon
1 teaspoon of sea salt

1 tablespoon of fresh mint, finely chopped
1 tablespoon of fresh parsley, finely chopped


Soak the rice overnight or for a least an hour. Drain, reserving the cooking liquid. Let the rice air dry for 15 minutes.

Using a mortar and pestle, make a paste with the fresh chilies, ginger, garlic, fennel, cinnamon, cardamom, cayenne and turmeric.

Heat a few tablespoons of oil, or a mixture of butter and oil, in a medium-large pot. When it is hot, add the onion and stir and fry for a few minutes. Next add the chili paste and stir-fry for about a minute.

Add the tomato and mushrooms to the pan and cook for another few minutes. Now add the rice and stir and fry for another minute. Add the water, lemon juice and salt, bring to a boil, cover and reduce the heat to low. Cook the rice until the liquid is absorbed, about 20 minutes. Remove from the heat, let sit for a few minutes and then mix in the parsley and mint. This dish serves 4 - 5 people.

Saturday, August 11, 2007

My BBM package has arrived!

Yay!!! My Blogging by Mail package has arrived!!!And all these fantastic things were sent to me by the sweet Molly, from the wonderful blog Batter-Splattered - all the way from Alaska!! Not only is she a terrific baker, but also a very thoughtful person!She sent me these delicious chocolate bars (it was sooo hard NOT eating them before taking the photo) and I was so glad because I’ve read about

Friday, August 10, 2007

Chewy Chocolate Chip Cookies

A friend of mine recently requested I make a treat for him to take to a social function. I decided to make these chocolate chip cookies after reading a review of various chocolate chip cooking recipes at Confections of a Food Bride. I've since noticed that this recipe has been featured on a number of food blogs, and many bakers are claiming this is the best ever chocolate chip cookie recipe. They are rather like the large chewy cookies you are likely to find at bakeries and farmer markets. This recipe is a keeper! Miraculously, the cookies made it to the function and apparently they were a success because there were none left by the end of the evening. I altered the recipe slightly after reading some reviews and I reduced the size of the cookie to make the batch go further. If you want a larger cookie, use about 1/4 cup of dough for each cookie.
Big, Fat, Chewy Chocolate Chip Cookies

2 cups of unbleached white flour
1/2 teaspoon of baking soda
1/2 teaspoon of sea salt
3/4 cup unsalted butter, melted
1 cup of packed brown sugar
1/2 cup of white sugar
1 1/2 tablespoons of vanilla extract
1 egg
1 egg yolk
1 1/2 cups of semisweet chocolate chips
1/2 cup milk chocolate chips


Grease or line baking sheets with parchment paper.

Sift together the flour, baking soda and salt in a medium sized bowl. Set aside.

In a large bowl, cream together the melted butter, brown sugar and white sugar until well blended. Beat in the vanilla, egg, and egg yolk until light and creamy. Mix in the sifted dry ingredients until just blended. Fold in the chocolate chips. At this point, it is recommended you chill the dough in the refrigerator for a few hours or alternately, you can put the dough in the freezer for about a half hour.

Drop the cookie dough unto the prepared baking pans in heaping tablespoons sized portions. Each cookie should be three inches apart.

Bake in a preheated oven for 15-17 minutes, or until the edges are lightly browned. Remove from oven and let the cookies sit on the baking sheets for about five minutes before transferring them to wire racks to cool completely.

Yields approximately 2 dozen cookies, depending on how large you make them.

Thursday, August 9, 2007

Onion and Mint Raita with Chickpeas

Raita is a yogurt based condiment that is served chilled. It goes well with spicy Indian dishes because of the cooling effect the raita has on the palate. Typically, Raita contains little more than yogurt and vegetables, but the following recipe, adapted from Madhur Jaffrey's World Vegetarian, includes chickpeas, which makes this raita a little more substantial.
Onion and Mint Raita with Chickpeas

4 scallions, cut into very thin rounds
1 cup of plain yogurt
1/3 teaspoon of sea salt
freshly ground black pepper
1 teaspoon of cumin
1/4 teaspoon of cayenne
3 tablespoons of fresh mint
1 cup of cooked chickpeas


If you are using dried chickpeas, soak about 1/2 cup of the dried beans overnight. Bring to a boil, reduce the heat to a simmer and cook until the beans are soft, about one hour. Drain well.

In a medium sized bowl, combine the yogurt, scallions, salt, pepper, and spices. Whisk with a fork until smooth and creamy. Add the mint and cooked chickpeas and stir to combine. Serve chilled.

Wednesday, August 8, 2007

Delia Smith's Pesto Rice

Delia Smith's Vegetarian Collection is easily the most gorgeous cookbook in my library… it's even a little daunting at times to attempt to make food as beautiful as hers. But although a few of her recipes are more involving and are clearly intended for grander entertaining purposes than I usually require, there are many more simple and eloquent dishes that don't take any more know-how or time than the typical cook has but make you appear to be a trained chef to your family and friends.

This pesto rice is one such easy and elegant addition to an ordinary summer dinner that will make it seem anything but ordinary, and at the cost of very little time or effort. The fresh grated parmesan cheese and arborio rice give it the creamy and slightly chewy texture of risotto that we all love without the fuss of the usual reduction-based cooking method for risottos, while the homemade pesto is as cool, refreshing and as perfect a background for rice as it is for pasta. One could think they're sitting at an expensive seaside Italian restaurant when this is put before them. I prefer it served warm, but it goes equally well as a cold rice salad for picnics or outdoor meals. If you discipline your diners, it will serve 4 to 6 people as given below, but it's not a bad idea to be prepared for people to ask for seconds and double the recipe.

This recipe was so successful that I've decided to make this my first entry to Weekend Herb Blogging, a weekly event started by Kalyn's Kitchen. This weeks host is Cooking Diva.
Delia Smith's pesto rice

Pesto:

2 ounces fresh basil leaves
1 tablespoon pine nuts
1 large clove garlic, crushed
1 ounce fresh parmesan cheese, grated
1/2 teaspoon sea salt


Rice:

1 cup arborio rice
2 cups vegetable stock
1 teaspoon sea salt
juice of one lemon
2 tablespoons olive oil
fresh ground black pepper


Garnish:

fresh basil leaves, torn or bruised
4 green onions, finely sliced
fresh parmesan cheese, pared into shavings with a knife or peeler


Once the ingredients are prepared, heat the vegetable stock over low-medium heat in a medium saucepan, being careful not to bring to a boil. If it does start boiling, turn down the heat slightly and remove the pan from the burner for a few moments.

In the meantime, make the pesto by putting the basil, pine nuts, garlic, salt and olive oil into a food processor or blender and purée until smooth. Transfer to a bowl and stir in the grated parmesan cheese.

Take a few spoonfuls of the pesto and stir into the rice to coat all the grains. When the vegetable stock is hot but not boiling, pour the coated rice into the saucepan and stir in the salt. Turn up the heat on the stove. As soon as the rice and stock begin to boil, cover with a lid and turn down the heat to low. Cook for exactly 20 minutes.

Once the rice is cooked, transfer it to a serving bowl. Add the remaining pesto, lemon juice, olive oil and fresh ground black pepper to taste, and combine by stirring gently.

If serving warm, scatter the garnish ingredients over the top and serve. If cold, add the garnishes just before serving.

Tuesday, August 7, 2007

Ethiopian Lentil & Mustard Salad (Azefa)

As long as the heat wave in southwestern Ontario keeps going, the culinary themes in Lisa's Kitchen will continue to be: simple, simple and simple! For this reason, I decided to make an azefa, a classic Ethiopian lentil and mustard seed salad that not only fits the bill for being simple but has an astonishing blend of earthy and pungent flavours that will strike anyone's attention, not to mention help them sweat out the heat. Unlike pre-prepared mustards whose flavour is diluted by time and packaging, fresh ground mustard seeds mixed with a little boiling water gives the spicy mustard dressing in azefa a fresh and powerful kick.

I've adapted my azefa from one given in Madhur Jaffrey's World Vegetarian, which has been for years now an indispensable resource to me for fast, simple, exotic and delicious vegetarian recipes. I substituted fresh jalapeño peppers from my garden for the 1/2 green bell pepper that she suggests and, of course, by ratcheting up the cayenne a little. If you want to tone down the heat, I'd recommend reducing the cayenne to a 1/8 or 1/4 teaspoon instead of sacrificing the hot peppers, which I've found to be an essential part of this and other azefa recipes. Similarly, the addition of a pint of grape tomatoes or one large diced tomato will help mellow the palate's reaction to the hot mustard dressing. One small chopped onion may be added as well.
Ethiopian lentil & mustard salad (Azefa)

1 cup green lentils
2 teaspoons brown mustard seeds
1 teaspoon black peppercorns
1 teaspoon sea salt
1/2 teaspoon cayenne
juice of 2 lemons
3 tablespoons olive oil
4 large jalapeño peppers, seeded and cut into 1/2-inch long matchsticks


Wash the lentils and put into a medium saucepan with 3 cups of water. Bring to a boil over medium-high heat, then turn down the heat to low and cover, cooking gently for 30 minutes or until the lentils are tender. Drain and set aside to let cool.

Add the mustard seeds, peppercorns, salt and cayenne into a clean coffee or spice grinder and grind finely. Put into a small bowl and mix well with 2 tablespoons of boiling water. Now add the lemon juice and olive oil and stir in well.

Pour the jalapeño peppers and dressing over the lentils and toss thoroughly. Serve warm or chilled. Serves 4 to 6.

Monday, August 6, 2007

Lazy Summer Cottage Cheese & Fruit Salad

As anyone who has lived through the middle of a southwestern Ontario summer knows, there are days so hot and humid that cooking a dinner is simply unthinkable and even eating ought to be kept to a minimum of work. Of course, you can always order out for a pre-prepared meal, but if you're like me and you like to know exactly what you're getting in your food, you can try out this very simple and light, cool and refreshing solution that I've been using for years now — a no-cook cottage cheese and fruit salad. It's not only a delicious and colourful way to incorporate much-needed vitamins, proteins and fats into a meal without over-exercising your digestive system, but the middle of summer here in Ontario is such an amazing opportunity to load up on fresh local fruits like berries, plums, peaches, apricots and melons that it would be a shame not to take every conceivable advantage of it.

In this summer weekend's edition I've tossed in some green grapes, kiwi fruit, strawberries and a diced apple to go along with some local blueberries, apricots and black cherries that I found at the market, but needless to say any medley of your favourite fresh fruits can be used satisfy your own desires.

In fact, there are no rules for a summertime cottage cheese and fruit salad except one — use a dry, pressed cottage cheese for the flavour, instead of the typical and much blander curds and liquid variety found in tubs, and most importantly make sure to find cottage cheese with a high milk fat content, like this 10% milk fat product sold by Western Creamery. Not only are fats essential carriers for fat-soluble vitamins, but low-fat milk products almost always come from poor-quality high-production cattle herds bred to deliver massive quantities of milk — only by marketing low-fat milk as "healthy" can milk marketing boards dispose of their large yields at a high consumer margin. And, contrary to intuition, milk fat doesn't cause weight gain — low-fat milk products do!

Parmesan-stuffed chicken breasts


Ever since I bought this book I’ve been meaning to make every single recipe from it – the food looks delicious!

These chicken breasts were good, but not what I expected - I truly believe that marinating the chicken for a couple of hours - instead of seasoning it right before baking it - would do wonders in the flavor department. Not sure I’d give this a go again, though.

I reduced a little

Sunday, August 5, 2007

Shahi Egg

When I found out that A Fridge Full Of Food was hosting a collection of weekend breakfast recipes at the end of the month with the theme Ethnic Dishes with a Twist, I was immediately drawn in. As readers here know by now, I love cooking weekend breakfasts almost as much I love ethnic cuisines, especially Indian. After some thought, this shahi egg curry seemed like the perfect recipe to enter into the event, not only because it is a warming, satisfying and wholesome centerpiece to a weekend breakfast, but also because it's a twist on shahi paneer, the old classic North Indian cheese curry cooked Moghlai-style in a vegetable gravy.

There are dozens if not hundreds of ways to make a shahi gravy, but this version is simple and fast enough not to daunt a weekend breakfast cook who wants to get food on the table without too much fuss or time but still serve up great flavour. And you can also substitute a cup and a half of cubed paneer cheese to make a delicious side dish to any North Indian meal.
Shahi egg

6 large eggs, hard-boiled, peeled and cut into halves lengthwise
2 tablespoons ghee, or a mixture of butter and olive oil
1 large onion, chopped
3 or 4 large green chillies, seeded and diced
1/2 teaspoon chilli powder
1/4 teaspoon cayenne
1/4 teaspoon turmeric
2 medium tomatoes, chopped
5 garlic cloves, minced or crushed
1/2 cup milk or yoghurt
1/2 teaspoon garam masala
1 teaspoon sea salt
2 tablespoons chopped coriander or parsley leaves


Heat the oil in a frying pan over medium heat. When hot, stir in the onions and fry for 2 or 3 minutes until the onions just begin to brown at the edges. Stir in the chilli peppers and fry for another couple of minutes. Add the chilli powder, cayenne and turmeric and coat the onions and peppers.

Pour in the tomatoes and garlic. Fry for 10 minutes or until the tomatoes are very soft and well reduced, stirring frequently and adding a few tablespoons of water periodically to prevent the mixture from sticking to the pan.

When the mixture resembles a thick gravy, stir in the milk or yoghurt and cook just briefly enough to incorporate it into the gravy. Reduce the heat to low and stir in the garam masala and salt. Add in the eggs and stir in gently enough to warm them up and coat them in the gravy well. Remove the pan from the heat and ladle the eggs and gravy into a wide shallow bowl for serving. Garnish with the coriander or parsley.

Serves 2 to 4.

Saturday, August 4, 2007

Food For Thought

Only a short time after starting Lisa's Kitchen, I was invited to be a guest blogger at Food for Thought, the official blog for foodtv.ca. I'm excited to announce that my first post about a visit to the Covent Garden Market Farmers Market here in London has been published. Go have a look if you please. I suggest you take a tour of the Canadian Food Network's website, as you will be sure to find some mouthwatering recipes and helpful hints. If you happen to reside in the London area, I would also recommend stopping by International Bakery next time you visit the Covent Garden Market. Normally, I restrict my bread consumption to the fine sourdough breads provided by Littlestream Bakery, with thanks to Conrad who runs Grains and Beans, and Things for providing such nourishment, but I picked up a grain packed loaf of bread from International Bakery's outdoor stall which proved to be a truly delicious component to the Baked Blueberry French Toast I enjoyed the following day.

Thursday, August 2, 2007

Olive and Goat Cheese Bruschetta

Ontario is in the grips of an intense heat wave and my kitchen has adapted accordingly. Salads and quick and easy meals are on the menu for the next little while. But this does not mean that one has to sacrifice taste, as I proved last night. As always, I welcome requests for dishes, and recently Leslie took me up on that offer by requesting a recipe for Bruschetta bread. I don't recall if I have made bruschetta before, but I wasn't satisfied with the recipes I found, so I created my own version. Just one slice makes for a satisfying summer meal.

Olive and Goat Cheese Bruschetta

8 thick slices of Italian bread
4 tablespoons of olive oil
1 clove of garlic, crushed
juice from one small lemon
1 shallot, finely chopped
1 - 2 jalapeno peppers, finely chopped
4 - 5 mushrooms, roughly chopped
2/3 cups of olives, pitted and chopped
1 medium tomato, seeded and diced
113 grams of goats cheese
2 tablespoons of fresh parsley, finely chopped
1 tablespoon of fresh basil, finely chopped
sea salt and cracked black pepper


Heat a teaspoon of the oil in a frying pan over medium to high heat. When hot, add the shallots and stir and fry for a few minutes. Then add the jalapeno peppers, lemon juice and mushrooms. Fry for a few minutes, or just until the mushrooms begin to release their juices. Remove from heat and season with salt and pepper. Set aside.

In a mortar and pestle, make a paste of the olive oil and garlic.

Toast the bread under the broiler until golden. When the bread is ready, brush each slice with the garlic and olive oil mixture. Next spread each slice with some goats cheese. Then top with the mushroom mixture, olives and chopped tomato. Finish off by sprinkling each slice with the fresh herbs and a little more black pepper.

Brazilian anthill cake

This cake is called “anthill cake” because when you slice it, it looks like there are a thousand ants inside it:Don’t be scared! These are chocolate sprinkles. :)I think I had not eaten this cake in 8 years or so – I’m not kidding!It’s a very traditional cake here and delicious even without any icing. Some recipes call for desiccated coconut, but the one I grew up baking doesn’t.I used to bake