Saturday, June 9, 2012

Gandharaj lebur mutton curry (Mutton curry with gandharaj lemon)

Gandharaj lebur mutton curry

Recipe Category
Non veg, Mutton
Easy to make at home
Very easy
Ingredients Availability
Look for Gandharaj Lemon
Time to Prepare
40 min
This preparation Serves
2-3 person

Mutton or red meat is not taht much popular at my home. But my hubby loved mutton recipes. So some times he used to have mutton at restaurent or office cafee. But its not like I never eat mutton, but very less. 

So last satarday was a lucky day for my hubby as he bring mutton, because I found a very tempting mutton recipe in my favourite sananda magazine. And I could not stop myself to go for it. Although I did not manage all the ingredients, but I am posting here my version of that recipe. Lets see how to prepare this mutton recipe.

What elements required to make Mutton Curry

Ingredients: 
1/2 kg mutton(cut them in small pieces)
1 gandharaj lemon
2 lemon leaves
1/2 tbsp garlic paste
1/2 tbsp ginger paste
1/2 tbsp turmeric powder
1 tbsp jeera powder
1 tbsp dhania powder
2 green chili finely chopped
2 onions (paste them)
Pinch of black paper
Masturd oil
1/2 cup yogurt

How to make Mutton Curry with Gandharaj lebu

  1. Wash mutton properly.
  2. Keep in a big bowl and add yogurt, ginger garlic paste, gree chili and salt.
  3. Marinate them properly and keep in fridge for 1-2 hours.
  4. In a pan heat oil for 1-2 min.
  5. Add onion paste,turmeric powder and keep stiring.
  6. Cook the onions for few min.
  7. Now add other spices, jeera powder, dhania powder and black powder.
  8. Finally add the marinated mutton and mix everything properly.
  9. Gradually mutton will start loosing water.
  10. Mutton will take time to boil, so we will put it in pressure cooker.
  11. So increase the flame and fry the mutton.
  12. When everything looks good, we will add water to make a gravy.
  13. Now add Gandharaj lemon juice and leaves in it.
  14. Now put the mutton in a pressure cooker and wait for 10-12 whistel.
  15. It may be less or more depending upon the water. In my case it took 12 whistels.
  16. Finally a juicy mutton gravy with a very yummy flavour is ready.
  17. Serve hot with boiled rice.

Friday, June 8, 2012

Milk chocolate stracciatella ice cream


The day is cold, gray, cloudy, the rain comes and goes, and I plan to spend the afternoon under the blankets, with a bowl of popcorn and a good movie. Too bad this delicious ice cream is long gone - it was so amazing I would certainly have a bowl of it even on this chilly day. :)

Milk chocolate stracciatella ice cream
from the always amazing The Perfect Scoop

225g (8oz) milk chocolate, finely

Thursday, June 7, 2012

Useful almond nutrition facts you should know

Almond nutrition facts

Picture taken from
http://twincommodities.com
Almonds or mostly known as Badam at home are very well known by us. All moms are mostly running after their kids to have almonds everyday morning. We all know that almonds are very good for health. And recently in television ads we can see many promotions where almonds can improve your brain. But besides that do you really know almond's nutrition facts. Lets see what are the main benefits of almond.

Health benefits of almond:

Almonds are very good for brain development, as we all know about that.For a growing kid almonds help their brain growth. You can have almonds everyday morning by soaking them overnight.

Almond helps to increase the level of high density lipoproteins (HDL) and reduce the level of low density lipoproteins (LDL), which further help controlling cholesterol levels. LDL cholesterol is known as bad cholesterol. 

Regular consumtion of almonds helps to lower the risk of cancer, diabetes, Alzheimer's disease, and other chronic illnesses.

Almonds are very good for heart also, as they help to reduce cholestorel. Almond is also a very goiod source of folic acid, which help us to reduce the level of homocystein. Homocystein generally causes fatty plaque buildup in arteries.

Almonds are extensively used in soaps and oils. Means its a very good resource of skin care materials.

Almonds are an excellent resource of fiber, vitamin E, zinc, copper, potassium, phosphorus, iron and many important vitamins for health.

For adults, its a source of sodiam. Whioch help to controll the blood pressure.

This is not just end. Regular almond consumption helps diabetic patient, helps pregnant women to give birth a normal baby by adding lots of folic acid. Also it is a good source of mono-saturated fat, which further helps us to reduce weight .

How to eat almond


The best way to eat almond every day is soak 5-6 almonds in water overnight. Next day morning have them in empty stomach. You can remove the cover of each almond and then eat. Or else wash them properly to have them with skin.

You can roast them and then grind them and store at home. Use roasted almonds while preparing for any cake,sweet dishes or other recipes.
In market you might get many almonds product. Like almond butter, biscuits etc. You can gor them also.
But the best way is the first one, soaking almonds in water. Because in this case you will get maximum vitamins and useful ingredients of almonds.

Fig Salad with Fresh Basil, Arugula, Goat Cheese and a Pomegranate Vinaigrette

This was my first time cooking with fresh figs and as the weather warms up, I look toward offering more salads at my dinner table. The blend of flavors here is magnificent. How can you go wrong with mixed greens and herbs, sun-dried tomatoes and olive oil? And then, there is goat cheese … a must for this recipe that I have adapted from Plenty by Yotam Ottolenghi.

This is one of my favorite books that has so many offerings for vegetarians and vegans too. The pictures are divine and really, this should be a coffee table book in addition to a guide for wonderful meal ideas. Certainly a prize for us cookbook fiends. Indeed, there's plenty of goodness here and also lots of easy and adaptable recipes. I was considering adding black olives to this beautiful warm weather salad, but I think this dish stands on its own just as I outline here because the olives might be a bit overpowering, but perhaps green olives might be a nice addition.

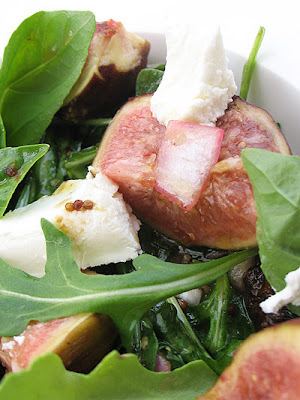
fig salad with basil, arugula, goat cheese and pomegranate vinaigrette

Fig Salad with Fresh Basil, Arugula, Goat Cheese and a Pomegranate VinaigretteFig Salad with Fresh Basil, Arugula, Goat Cheese and a Pomegranate Vinaigrette
Recipe by
Adapted from Plenty: Vibrant Vegetable Recipes From London's Ottolenghi
Published on June 7, 2012

A fresh peppery arugula and basil summer salad served with a pomegranate vinaigrette and topped with fresh figs and crumbled goat cheese

Print this recipePrint this recipe

Dressing:
  • 1 large shallot, finely sliced
  • 1 teaspoon Dijon mustard
  • 2 teaspoons pomegranate molasses
  • 1 teaspoon sea salt
  • fresh cracked black pepper to taste
  • 3 tablespoons extra virgin olive oil
Salad:
  • 1 1/2 cups fresh arugula (reserve a small handful for garnish)
  • 3/4 cup fresh basil (reserve a small handful for garnish)
  • 4 - 5 sun-dried tomatoes, soaked in hot water for 30 minutes, drained and chopped
  • 8 ripe figs, rinsed and kept at room temperature, sliced vertically and then cut into quarters
  • 5 oz (140 g) goat cheese, crumbled
Instructions:
  • To prepare the dressing, whisk together the shallot, Dijon mustard and pomegranate molasses in a small bowl. Add salt and pepper and then whisk in the olive oil gradually.

  • In a large bowl, combine the arugula, basil and sun-dried tomatoes, reserving some of the arugula and basil leaves for garnish. Toss with the dressing.

  • Transfer portions to plates and serve at room temperature topped with figs, crumbled goat cheese and more olive oil and seasoning if desired, and garnished with the remaining arugula and basil leaves.

Makes 4 servings
fig salad with mixed greens and goat cheese

More salads that you will be sure to enjoy from Lisa's Vegetarian Kitchen:
Greek Salad
Lisa's Classic Vegetarian Caesar Salad
Ethiopian Lentil & Mustard Salad (Azefa)
Quinoa Spinach Salad with Feta, Pomegranate and Toasted Almonds

On the top of the reading stack: The Ethnic Vegetarian by Angela Shelf Medearis

Audio Accompaniment: Jan Jelinek

Pyaz ka raita (Onion raita)

Pyaz ka Raita Recipe

Recipe Category
Veg, Curd recipe
Easy to make at home
Very easy
Ingredients Availability
Available everywhere
Time to Prepare
10 min
This preparation Serves
2-3 person


Curd is a very common item mostly used in our kitchen. It has very good source of Protein and Calcium. Also its is very good for digestion. So raita is very well source of healthy & digestive ingredients.

What elements required to make Pyaz ka raita

Ingredients:
2 cup curd (you can get amul packaged curd or make yourself at home)
1/2 cup water
1 onion finely chopped
Fresh coriander leaves finely chopped
salt to taste
Raw Mustard seeds
1 dry chilli
1 green chilli finely chopped
1 tbsp oil

How to make Pyaz ka raita 

  1. Mix the curd and water in a container.
  2. mix them thoroughly by adding salt as per requirement.
  3. Now add onions and litle coriander powder.
  4. Add chopped chillis also.
  5. Now in a pan heat oil and the mustard seeds & dry chilli.
  6. Roast them well and then put this over the curd mixture.
  7. Mix them altogether.
  8. You can serve hot or keep it cool in a fridge for 1-2 hours.

Wednesday, June 6, 2012

Rawa idli

Rawa/Sooji Idli Recipe


Recipe Category
Veg, Breakfast
Easy to make at home
Very easy
Ingredients Availability
Available everywhere
Time to Prepare
20 min
This preparation Serves
2-3 person


Yesterday I have posted a very simple way of making idli at home. That was the very basic recipe. Now a days in market we can get the ready to cook idli mixes as well. Recently I tried one of them. that was MTR's rawa idli mix. I found that very tasty. The idli looks so fluffy and soft.

What elements required to make rawa idli

Ingredients:

2 cup of MTR rawa
1/2 tbsp crushed ginger
1-2 finely chopped green chilies
1/4 tbsp soda
1 cup yogurt/curd
1-2 tbl spn oil
Salt


You can directly follow the recipe mentioned in the MTR's packet as well.

How to make rawa idli 

  1. Mix MTR rawa mix with curd and all other spices.
  2. Make a very smooth batter.
  3. Don't make it thinner, try to make it as thick as paste.
  4. A little less than paste.
  5. Now in a idli maker, put the mixer in each cup.
  6. Cook for 30 min and your soft rawa idli is ready.
  7. Serve hot with coconut chutney.

Olive oil bread + "The Hunger Games"


I asked for your thoughts on “The Hunger Games” trilogy a couple of months ago and today I want to tell you that I’m hooked on the books! By some of my readers’ suggestion I started with “The Hunger Games” even though I’d watched the movie and I really liked the book – my love for the movie got even bigger. Last night I started reading “Catching Fire” and the only reason I’ve put the book aside

What is a cheque book : some useful points to note

Introduction to Bank cheque book


image from http://www.buzzom.com
Cheque book is very familier to all of us. If you have a bank account, then you should have a cheque book. You can fill the form while opening for the account first time. Having a chequebook will provide lot of facilities to you. Generally there is a limit to withdraw money by ATM card, but for cheque book you can go for any amount.

A cheque is the usual method of withdrawing money from a current account, Savings accounts are also permitted to be operated by cheques provided certain minimum balance is maintained. A cheque without a date is considered incomplete  and is returned unpaid by the banks. A cheque that bears a date earlier than six months is a stale cheque and can not be claimed for.

Types of Cheques:


There are many types of chequebook available in every bank. Each type has its own use. Among them few are : Bearer Cheque, Order Cheque, Non transferable, Crossed Cheque/Account payee cheque, Post-Dated Cheque etc. Always ask your bank clerk about your requirement and then apply for a chequebook.

Who can apply for a cheque book :

There are many types of chequebook available in every bank. Each type has its own use. Among them few are : Bearer Cheque, Order Cheque, Non transferable, Crossed Cheque/Account payee cheque, Post-Dated Cheque etc. Always ask your bank clerk about your requirement and then apply for a chequebook.

Advantages of a cheque:


You can carry the cheque book instead of cash. For a big payment you can use the cheque.
If you dont have access to internet banking or you don't have your own laptop, you can go for cheque book to complete your payments. As its not advised to use internet banking from a cyber cafe. Its not safe.
In case of cheque, there is no limit of amount for any payment. As per your balance maintained in your account you can pay as much as you can.You can reissue a cheque book easily from branch or even internet banking.

Disadvantages/Risks of a cheque :

  1. You should always know how much balance is there in your acocunt. Otherwise if you make a payment greater than your account balance, your cheque will bounce. In that case you have to pay a penalty. Sometimes you have to feel the embarassment also.
  2. Becarefull with your signature. Dont disclose it. Keep your chequebook in a safe place.
  3. Dont sign a blank cheque for future use. May be you think it will save you time. But if it reaches to someone else by any chance, just think what can happen.

Best practices to follow:

  1. Always fill the details clearly. Dont overwrite any text.
  2. Mention the date and amount clearly.
  3. Always mention account payee on the top left of the cheque.
  4. In the cheque book maintain all the cheque numbers with corresponding details.
  5. Dont use ink pen to fill a cheque. Use only ball pen.
  6. While submitting a cheque to a bank, mention your account number and phone number. The bank clerk might need to contact you.
  7. Always keep the cheque deposit slip from the bank for reference.

Tuesday, June 5, 2012

Idli recipe

Idli Recipe

Recipe Category
Veg, Breakfast
Easy to make at home
Very easy
Ingredients Availability
Available everywhere
Time to Prepare
20 min
This preparation Serves
2-3 person

What elements required to make idli

Ingredients:
500gm urad daal
100 gm rice (atap rice)
Salt to taste
1 tbsp sugar
hot water
idli maker


How to make idli 

  1. Soak rice and dal in separate container overnight.
  2. Now grind them to paste separately. Use hot water while grinding.
  3. Now mix both the paste and add salt, sugar.
  4. Make a thick paste and keep the mixture for 10-11 hours.
  5. Now in the idli maker add the batter in small idli container and cover.
  6. cook for 25-30 min. Idli is ready.
  7. be careful while making the batter, as a thin batter will not make a good idli.

Chickpeas in a Tomato and Tamarind Gravy with Spices

Often I have been asked where my inspiration comes from in the kitchen. Plenty and varied it is. At times, when I am having a sleepless night, I will draft a recipe in my head and jot it down in the morning. At other times, I will get an idea and fuse a few recipes ideas into one that can surely be said to be my own. I enjoy looking through cookbooks and, time permitting, visiting my favorite blogs for ideas that I can adapt from and enjoy. At this point in time, after cooking for many years, I understand the correct balance of flavors and proportions that will please the senses of most of my friends and myself and husband.
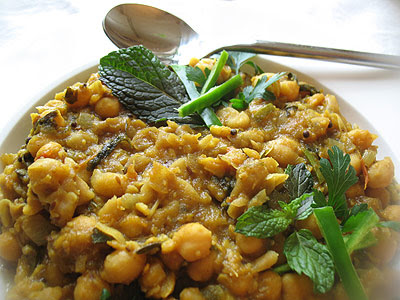
chickpeas chutney

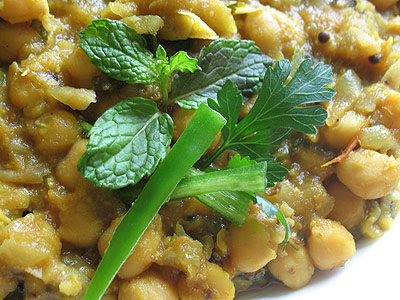
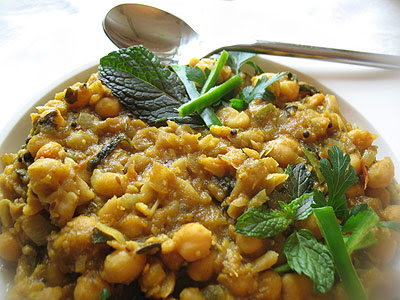
Oddly enough, this food blogger who cooks up creations that receive rave reviews does not like to eat too much at a time. Not a bad thing when you consider it. Why tax your system with a huge meal? All the same, if I am not really that hungry, my own food is the cure to that problem most of the time. I don't mean to sound arrogant here, but just saying that I know what I like. This thick chickpea dish is almost like a chutney and certainly pairs well with grains or wrapped up in a flatbread.

chickpeas

 Chickpeas in a Tomato and Tamarind Gravy with Spices Chickpeas in a Tomato and Tamarind Gravy with Spices
Recipe by
Cuisine: Indian
Published on June 5, 2012

Chickpeas simmered in a thick and earthy but tangy and spicy tomato and tamarind gravy

Print this recipePrint this recipe

Ingredients:
  • 1 1/2 cups dried chickpeas
  • 1-inch piece fresh ginger, minced
  • 1 clove garlic, crushed
  • 1/4 teaspoon baking soda
  • 4 - 5 black cardamon pods, crushed
  • 1 stick of cinnamon
  • 2 bay leaves
  • 5 cups water

  • 3 tablespoons sesame oil or ghee
  • 1 teaspoon cumin seeds
  • 1 teaspoon black mustard seeds
  • 1/2 teaspoon ajwain seeds or dried thyme
  • 1 large onion, finely chopped
  • 1 tablespoon ground coriander
  • 1 teaspoon ground cumin
  • 1/2 teaspoon garam masala
  • 1/2 teaspoon turmeric
  • 1/4 teaspoon cayenne pepper
  • pinch of asafetida
  • 1 1/2 teaspoons sea salt
  • 1 large tomato, diced

  • 3 fresh green chilies, seeded and sliced into small strips
  • 3 tablespoons tamarind paste
  • 1/2 cup fresh cilantro or parsley, chopped
  • 2 tablespoons fresh mint, trimmed and chopped
Instructions:
  • Rinse the chickpeas and soak for 8 hours or overnight in several inches of water with a little yogurt whey or lemon juice added. Drain and rinse, and transfer to a large saucepan along with the ginger, garlic, baking soda, cardamon pods, cinnamon, bay leaves and water. Bring to a boil, reduce heat to medium-low, cover and simmer for 1 to 1 1/2 hours or until the chickpeas are tender. Mash some of the chickpeas with a fork or potato masher.

  • Heat the oil or ghee over medium heat in a frying pan. When hot, add the mustard seeds, cumin seeds and ajwain seeds or dried thyme. Stir and fry until the mustard seeds begin to pop. Toss in the onion and stir and fry for 5 minutes or until the onion begins to brown. Now add the spices and salt and stir and fry for a minute. Add the tomatoes to the pan and cook until the mixture is thickened. Transfer to the pan of chickpeas along with the chilies, tamarind and half of the chopped herbs. Bring to a boil, reduce the heat slightly. and cook for another 15 minutes or until thickened.

  • Garnish with the remaining herbs and serve hot with fresh cooked rice or flatbreads.

Makes 6 servings
chickpeas tamarind chutney

More Chickpea dishes you are sure to enjoy from my Vegetarian Cooking site:
Baked Paneer and Chickpea Cutlets
Chana Saag
Chickpea Vindaloo
Chickpeas with Mushrooms

On the top of the reading stack: browsing my library

Audio Accompaniment: silence

Cauliflower Kachori (Gobi ki kachori)

Cauliflower Kachori Recipe

Recipe Category
Veg, Snack Recipe
Easy to make at home
Very easy
Ingredients Availability
Available everywhere
Time to Prepare
20 min
This preparation Serves
3 person

What elements required to make this recipe

Ingredients:
1 big gobi or cauliflower
1 potato
1 big onion finely chopped
250 gm Maida
15-20 pea nuts
1 tbsp ginger garlic paste
2 green chili finely chopped
1 tbsp jeera powder
1/2 tbsp turmeric powder
1 tbsp sauf (Misti jeera)
2 tbsp mustard oil
1/2 tbsp ghee
Sunflower/Soybean oil for deep fry
Salt to taste

How to make Gobi ki Kachori 

  1. Cut the gobi in small pieces and also cut the potato in cubes.
  2. Boil them both with little salt in a pan.
  3. Now mash half of boiled vegetables with maida(flour) and salt. Make a dough.
  4. In a pan heat oil and fry the pea nuts first.
  5. Then add raw jeera (sauf). Wait for spluttering.
  6. Add onions, rest half vegetables and fry them properly for 5-6 min in a medium flame.
  7. Add jeera powder, turmeric powder, ginger garlic paste to that.
  8. Finally add ghee and if required add salt.
  9. Now from the dough, make 2 poori and put the fried vegetables as stuffing.
  10. Seal the outlines of the poories. It will be like a stuffed kachori.
  11. Now deep fry the kachori's one by one.
  12. Serve hot with sauce.

Monday, June 4, 2012

Chicken Cutlet

Chicken Cutlet Recipe

Recipe Category
Non Veg, Snack Recipe
Easy to make at home
Very easy
Ingredients Availability
Available everywhere
Time to Prepare
30 min
This preparation Serves
3 person

What All Elements Need To Prepare This Recipe


Ingredients:
200g Chicken Keema (You can purchase from supermarket)
1 potato
1 big onion finely chopped
1 tbsp ginger garlic paste
2 green chili finely chopped
1 tbsp jeera powder
1 tbsp Chicken Masala/Sabji Masala
1 egg
Bread crumbs or biscuit powder (you can prepare at home)
2 tbsp mustard oil
1/2 tbsp ghee
Sunflower/Soybean oil for deep fry
Salt to taste

How to make Chicken Cutlet Recipe


  1. Boil the potato and then make a peel.
  2. In a pan add oil and heat for 1-2 min.
  3. Add chopped onions and chilies. Stir well till golden brown.
  4. Add chicken keema, salt to that and fry them altogether.
  5. After 5-7 min of cooking, add ginger garlic paste and other masalas.
  6. Add little ghee to taste well.
  7. Finally add the potatoes and make a dough.
  8. In a separate container beat the egg with salt and in another one take bread crumbs.
  9. Now from the dough, make cutlet shapes. Dip that cutlet in the beaten egg.
  10. Next cover it with bread crumbs.
  11. Finally put the cutlet in a deep pan for deep frying.
  12. Fry till the color turns dark and crispy.
  13. Serve hot with sauce and salad.